
Hi Friends, In this tutorial, you will learn Spring Boot MVC CRUD Example with MySQL including this project walkthrough Thymeleaf template and Maven.
Spring Boot makes CRUD applications easier to develop through a component of standard JPA-based repositories. That produces applications packaged as jar and that is initiated directly with integrated servlet containers (such as Tomcat, Jetty). Therefore, no need to deploy the files for the war.
Spring Boot presents the spring framework with a rapid application development functionality involving auto-configuration, stand-alone code, and more features of Spring Boot as well. Let’s start the tutorial making this project.

We will develop simple CRUD Operations in Spring Boot via the following module in this tutorial.
Spring Boot: Allows rapid application creation to reduce source code by logical configurations.
Spring MVC: We handle client requests through the Spring MVC controller codes method.
Spring Data JPA: We control the data access layer that uses this module without constructing DAO classes.
Hibernate: Uses default Spring Data JPA integrated ORM framework.
ThymeLeaf: We control all view layers using this. JSP and JSTL tags were no longer confusing.
Database: And we use database MySQL.
Table Content
1. What is JpaRepository?
2. Database And Table Configuration
3. Creating A New Spring Boot Project
4. pom.xml
5. application.properties
6. Employee.java
7. EmployeeRepository.java
8. EmployeeService.java
9. Spring Boot Main Class
10. EmployeeController.java
What is JpaRepository?
JpaRepository is Repository individual JPA Extension. It includes CrudRepository's full API and PagingAndSortingRepository. This also provides APIs for fundamental CRUD operations and pagination and sorting APIs as well.
We see above that the JPARepository provides the full CrudRepository API which means that it also has all the methods available in the CrudRepository.
So in this application, we 're using the CrudRepository method some of which are mentioned below.
<S extends T> S save(S entity): Save and update a given entity. The entity must not be null and the saved entity; will never be null.
Iterable<T> findAll(): Returns all entities.
Optional<T> findById(ID id): Retrieves an entity by its ID. The ID must not be null.
void deleteById(ID id): Deletes the entity with the given ID. The ID must not be null.
Note: note took above all methods from ( docs.spring.io ).
Database And Table Configuration
First, you should create a database in your PhpMyAdmin and upload the code below under the database to quickly configure an employee table with fields of first name and last name.
CREATE TABLE IF NOT EXISTS `tbl_employee`(
  `emp_id` int(11) NOT NULL,
  `emp_firstname` varchar(15) NOT NULL,
  `emp_lastname` varchar(15) NOT NULL
) ENGINE=InnoDB DEFAULT CHARSET=latin1 ROW_FORMAT=COMPACT;
Creating A New Spring Boot Project
Step 1 – Go to http:/start.spring.io tool and bootstrap your Spring Boot projects as shown in the following figure.
1. Select Maven Project
2. Select -> Java language
3. Select 2.31 Spring Boot Version
Friends above three-step by default selection by spring initializer.
Let's fill up all Project Metadata Fields.
Group – com.onlyxcodes It is a common package name.
Artifact – SpringBootCRUDMVC. This is our project name.
Description – Apply few project short description like Spring Boot MVC CRUD Example With MySQL, JPA, Thymeleaf
Package Name – com.onlyxcodes.mvcapp. We bootstrap some other packages in this package and execute our application.
Packaging – Select Jar. It's include needed jar files.
Java – I select Java 8 but you can also select 11 and 14 versions if you use it in your machine.
5. Click from the right-hand sidebar on the ADD DEPENDENCIES button.
After opening a custom window, search and include one by one these dependencies Spring Web, Spring Data JPA, MySQL Driver, and Thymeleaf.
6. Finally, click on the GENERATE button in the bottom section to automatically download the project zip file.

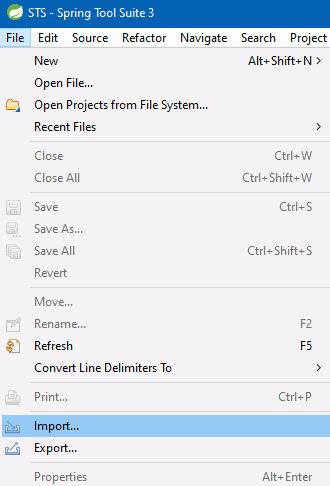
Step 2 – Start Spring Tool Suite. Go to File, and choose the Import option according to the figure below.
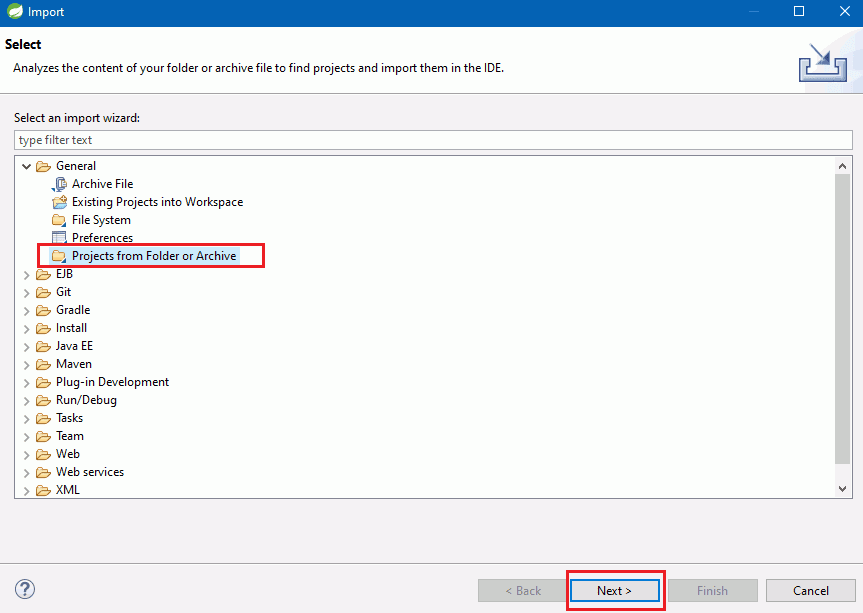
Step 3 – Click on Projects from Folder or Archive to see the Open custom window.
Step 4 – See again custom window open click on the Archive button right-hand sidebar.

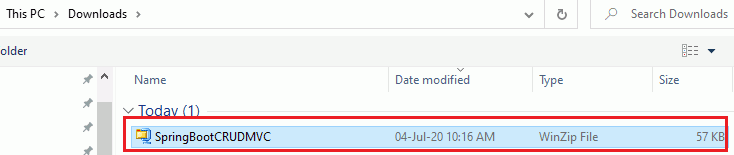
Step 5 – Select the SpringBootCRUDMVC project zip file from the path of the download folder.
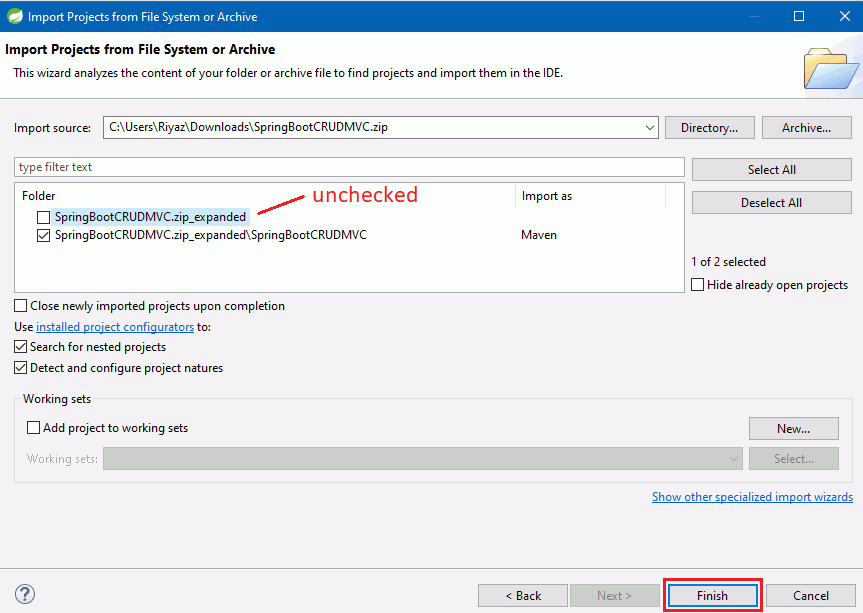
Step 6 – See the imported zip file of the project. Please uncheck the SpringBootCRUDMVC.zip_expanded checkbox as this is not mandatory. Click on the Finish button.
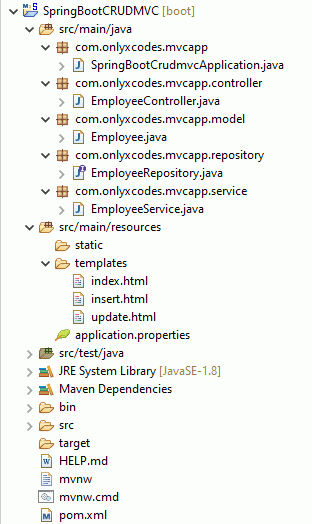
See below the complete directory structure of the project including additional packages that we will build in this project.
pom.xml
We use maven so spring boot can configure our all dependencies automatically.
<?xml version="1.0" encoding="UTF-8"?>
<project xmlns="http://maven.apache.org/POM/4.0.0" xmlns:xsi="http://www.w3.org/2001/XMLSchema-instance"
 xsi:schemaLocation="http://maven.apache.org/POM/4.0.0 https://maven.apache.org/xsd/maven-4.0.0.xsd">
 <modelVersion>4.0.0</modelVersion>
 <parent>
  <groupId>org.springframework.boot</groupId>
  <artifactId>spring-boot-starter-parent</artifactId>
  <version>2.3.1.RELEASE</version>
  <relativePath/> <!-- lookup parent from repository -->
 </parent>
 <groupId>com.onlyxcodes</groupId>
 <artifactId>SpringBootCRUDMVC</artifactId>
 <version>0.0.1-SNAPSHOT</version>
 <name>SpringBootCRUDMVC</name>
 <description>Spring Boot MVC CRUD Example With MySQL, JPA, Thymeleaf</description>

 <properties>
  <java.version>1.8</java.version>
  <maven-jar-plugin.version>3.1.1</maven-jar-plugin.version>
 </properties>

 <dependencies>
  <dependency>
   <groupId>org.springframework.boot</groupId>
   <artifactId>spring-boot-starter-data-jpa</artifactId>
  </dependency>
  <dependency>
   <groupId>org.springframework.boot</groupId>
   <artifactId>spring-boot-starter-thymeleaf</artifactId>
  </dependency>
  <dependency>
   <groupId>org.springframework.boot</groupId>
   <artifactId>spring-boot-starter-web</artifactId>
  </dependency>

  <dependency>
   <groupId>mysql</groupId>
   <artifactId>mysql-connector-java</artifactId>
   <scope>runtime</scope>
  </dependency>
  <dependency>
   <groupId>org.springframework.boot</groupId>
   <artifactId>spring-boot-starter-test</artifactId>
   <scope>test</scope>
   <exclusions>
    <exclusion>
     <groupId>org.junit.vintage</groupId>
     <artifactId>junit-vintage-engine</artifactId>
    </exclusion>
   </exclusions>
  </dependency>
 </dependencies>

 <build>
  <plugins>
   <plugin>
    <groupId>org.springframework.boot</groupId>
    <artifactId>spring-boot-maven-plugin</artifactId>
   </plugin>
  </plugins>
 </build>

</project>
application.properties
By following the codes, we connect the MySQL database, configuring JPA properties, and Thymeleaf fragments. We will import these codes inside src/main/resources/application.properties.
# MySQL database connecting utility
spring.datasource.url=jdbc:mysql://localhost:3306/springboot_mvc_crud_db
spring.datasource.username=root
spring.datasource.password=

# JPA property utility
spring.jpa.hibernate.ddl-auto=update
spring.jpa.properties.hibernate.show_sql=true


#view pages property utility
spring.thymeleaf.prefix=classpath:/templates/
spring.thymeleaf.suffix=.html
spring.datasource.url: This property establishes a connection to the MySQL database by explicitly loading the JDBC driver. But you can use other databases such as Oracle too.
spring.datasource.username: This property is where you add your username to the database. I put the "root" name default.
spring.datasource.password: Assign your password to the database. I don't use any of my database's passwords so I put it blankly.
spring.jpa.hibernate.ddl-auto: Is a hibernate feature monitoring behavior. (property: create, create-drop, validate, update).
Here we use the updated property which returns the schema values for updates. If the scheme is not present in the database, the schema is created in case of an update.
spring.jpa.properties.hibernate.show_sql=true: This property pretty print the SQL.
spring.thymeleaf.prefix: That's the value that'll be prepended to create the URL with a view name. Default value is classpath:/templates/.
spring.thymeleaf.suffix: That's the value that will be attached to create the URL with the view name. The default value is .html
Create JPA Entity or Model or Domain class
Employee.java
Create an Employee Model class in the com.onlyxcodes.mvcapp.model package to map with the employee table in the database. In this class, we describe five attributes to the annotation.
package com.onlyxcodes.mvcapp.model;

import javax.persistence.Column;
import javax.persistence.Entity;
import javax.persistence.GeneratedValue;
import javax.persistence.GenerationType;
import javax.persistence.Id;
import javax.persistence.Table;

@Entity
@Table(name = "tbl_employee")
public class Employee {

 @Id
 @GeneratedValue(strategy = GenerationType.AUTO)
 @Column(name = "emp_id")
 private Long id;

 @Column(name = "emp_firstname")
 private String firstname;

 @Column(name = "emp_lastname")
 private String lastname;

 public Long getId() {
  return id;
 }

 public void setId(Long id) {
  this.id = id;
 }

 public String getFirstname() {
  return firstname;
 }

 public void setFirstname(String firstname) {
  this.firstname = firstname;
 }

 public String getLastname() {
  return lastname;
 }

 public void setLastname(String lastname) {
  this.lastname = lastname;
 }

}
@Entity and @Table establish top of class annotation. @Entity proves that the class is a persistent Java class and @Table annotation used to map your existing database table.
@Id use primary key annotation. @GeneratedValue annotation can be used to specify the primary key generation strategy. GenerationType.AUTO, the default generation type AUTO that the table field auto Increment. @Coulmn annotation used to map columns from the table.
Note: If your database doesn't have a table, @Entity annotation informs Hibernate to create a table out of that class.
Create JpaRepository Interface
EmployeeRepository.java
Create an EmployeeRepository interface underneath in com.onlyxcodes.mvcapp.repository package. And extends JpaRepository which provides basic CRUD operations on the Employee model class and works with the Long ID type is a primary key to our application.
package com.onlyxcodes.mvcapp.repository;

import org.springframework.data.jpa.repository.JpaRepository;

import com.onlyxcodes.mvcapp.model.Employee;

public interface EmployeeRepository extends JpaRepository<Employee, Long> {

}
Create a Service Class
EmployeeService.java
Create class EmployeeService within a package of com.onlyxcodes.mvcapp.service. We write the business logic in this class to create, read, update, and delete details of the employees.
In this class, we use @Autowired for EmployeeRepository Interface class object injection. Spring Data JPA can make a substitute example of EmployeeRepository during a running time and inject it into the EmployeeService class object.
package com.onlyxcodes.mvcapp.service;

import java.util.List;

import org.springframework.beans.factory.annotation.Autowired;
import org.springframework.stereotype.Service;

import com.onlyxcodes.mvcapp.model.Employee;
import com.onlyxcodes.mvcapp.repository.EmployeeRepository;

@Service
public class EmployeeService {

 @Autowired
 private EmployeeRepository repository;

 public List<Employee> listAll(){

  return repository.findAll();
 }

 public void create(Employee employee) {

  repository.save(employee);
 }

 public Employee updateid(Long id) {

  return repository.findById(id).get();
 }

 public void delete(Long id) {

  repository.deleteById(id);
 }

}
List Employee
Using Spring Data JPA, outlining all the Employees for our application. We can't build a findAll() method upon on repository we specified, we inherited the extended of the CrudRepository in the Spring JPA data. It's one of many great features of Spring Data JPA.
public List<Employee> listAll(){

 return repository.findAll();
}
Save Employee (Create / Update)
In our web application, we use the save() method to create and update employees. Spring Data JPA already contains a save method for saving entities for us to implement.
public void create(Employee employee) {

 repository.save(employee);
}
Get Specific Employee
We can use the findById() method implemented already by Spring Data JPA to get an employee from its Id value.
public Employee updateid(Long id) {

 return repository.findById(id).get();
}
Delete Employee
Spring Data JPA includes a deleteById() method for us to implement. Spring Data JPA activates the deleteById() method which only accepts the ID value. To delete the desired entity, we use the ID value.
public void delete(Long id) {

 repository.deleteById(id);
}
Spring Boot Main Class
SpringBootCrudmvcApplication.java
This is the main class for bootstrapping our application from Spring Boot. This class can be found and executed inside the com.onlyxcodes.mvcapp package.
package com.onlyxcodes.mvcapp;

import org.springframework.boot.SpringApplication;
import org.springframework.boot.autoconfigure.SpringBootApplication;

@SpringBootApplication
public class SpringBootCrudmvcApplication {

 public static void main(String[] args) {
  SpringApplication.run(SpringBootCrudmvcApplication.class, args);
 }

}
Create Controller Class
EmployeeController.java
Create a controller class inside the package com.onlyxcodes.mvcapp.controller. That class acts as a Spring MVC controller for the creation, updating, and deletion of user requests.
In this class, we use @Autowired for EmployeeService class object injection. When each CRUD operation is implemented we will write code for the handler methods.
package com.onlyxcodes.mvcapp.controller;

import java.util.List;

import org.springframework.beans.factory.annotation.Autowired;
import org.springframework.stereotype.Controller;
import org.springframework.ui.Model;
import org.springframework.web.bind.annotation.ModelAttribute;
import org.springframework.web.bind.annotation.PathVariable;
import org.springframework.web.bind.annotation.RequestMapping;
import org.springframework.web.bind.annotation.RequestMethod;
import org.springframework.web.servlet.ModelAndView;

import com.onlyxcodes.mvcapp.model.Employee;
import com.onlyxcodes.mvcapp.service.EmployeeService;

@Controller
public class EmployeeController {

 @Autowired
 private EmployeeService service;

 @RequestMapping("/")
 public String viewIndexPage(Model model){
  List<Employee> employeeList = service.listAll();
  model.addAttribute("getAllEmployee", employeeList);
  return "index";
 }

 @RequestMapping("/new_add")
 public String viewNewEmployeeForm(Model model) {
  Employee employee = new Employee();
  model.addAttribute("employee", employee);
  return "insert";
 }

 @RequestMapping(value = "/save_employee", method = RequestMethod.POST)
 public String addNewEmployee(@ModelAttribute("employee") Employee employee) {
  service.create(employee);
  return "redirect:/";
 }

 @RequestMapping("/edit/{id}")
 public ModelAndView viewEditEmployeeForm(@PathVariable(name = "id") long id) {

  ModelAndView mav = new ModelAndView("update");
  Employee employee = service.updateid(id);
  mav.addObject("employee", employee);
  return mav;
 }

 @RequestMapping("/delete/{id}")
 public String deleteEmployee(@PathVariable(name = "id") long id) {

  service.delete(id);
  return "redirect:/";
 }

}
List All Employees
After the application is executed by default open the index page, and display all the list of employees available from the database by adding codes below.
@RequestMapping("/") maps this controller to the "/" URL. So after we write to the browser http://localhost:8080 then view the index page by default.
This method of controller returns the string "index," it is the page of the index. And tell Spring to communicate the "getAllEmployee" model attribute for all employees to view.
@RequestMapping("/")
public String viewIndexPage(Model model){
 List<Employee> employeeList = service.listAll();
 model.addAttribute("getAllEmployee", employeeList);
 return "index";
}
Note: We use ThymeLeaf rather than JSP, we place all template HTML files within the src/main/resources/templates directory.
index.html
This file displays a list of all the employees. Place these files in the src /main/resources/templates path, too.
Our controller has added a list of employees to the model's "getAllEmployee" property. Which we move to tag Thymeleaf. The name of the variable we assign to the iterator is "employee".
Thymeleaf th:each will iterate the collection. Thymeleaf uses the syntax th:text="${}" which can be used to access a value from an object in the java.
Open your web browser and type the http://localhost:8080 URL to see that the open index page and list all employees.
<!DOCTYPE html>
<html xmlns:th="http://www.thymeleaf.org">
<head>
<meta charset="ISO-8859-1">
<title>Index Page</title>
</head>
<body>
<div>
 <h2><a href="new_add">Add Employee</a></h2>
 <br/>
 <table border="1">
  <thead>
   <tr>
    <td>Employee Id</td>
    <td>Employee Firstname</td>
    <td>Employee Lastname</td>
    <td>Edit</td>
    <td>Delete</td>
   </tr>
  </thead>
  <tbody>
   <tr th:each="employee : ${getAllEmployee}">
    <td th:text="${employee.id}">ID</td>
    <td th:text="${employee.firstname}">Firstname</td>
    <td th:text="${employee.lastname}">Lastname</td>

    <td><a th:href="@{'/edit/' + ${employee.id}}">Edit</a></td>

    <td><a th:href="@{'/delete/' + ${employee.id}}">Delete</a></td>
   </tr>
  </tbody>
 </table>
</div>

</body>
</html>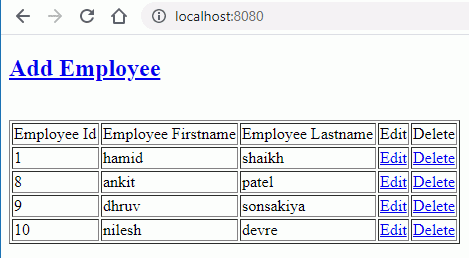
Create New Employee
We already have a hyperlink in index.html file which allows users to build a new employee.
<h2><a href="new_add">Add Employee</a></h2>This method of controller returns the "insert" string, it is an insert.html file. The @RequestMapping annotation maps this controller action to the new_add URL. Clicking on Add New hyperlink will show the file insert.html.
In model attribute property we assign Employee model class object "employee".
@RequestMapping("/new_add")
public String viewNewEmployeeForm(Model model) {
 Employee employee = new Employee();
 model.addAttribute("employee", employee);
 return "insert";
}
insert.html
We create a new employee record in this file and within this file was included in the Thymeleaf fragment.
The attribute name "employee" will be used in the "insert.html" file with the attribute Thymeleaf th: object in < form >.
<form th:object="${employee}" th:action="@{/save_employee}" method="post">th: action is assigned with the action URL called upon to submit the form. Upon submission of the form, the URL /save_employee will access the controller class using the following methods.
<!DOCTYPE html>
<html xmlns:th="http://www.thymeleaf.org">
<head>
<meta charset="ISO-8859-1">
<title>Insert New Employee</title>
</head>
<body>
<div>
 <h1>New Employee Form</h1>
 <br/>
 <form th:object="${employee}" th:action="@{/save_employee}" method="post">
 <table border="1">
   <tr>
    <td>Employee Firstname</td>
    <td><input type="text" th:field="*{firstname}" /></td>
   </tr>
   <tr>
    <td>Employee Lastname</td>
    <td><input type="text" th:field="*{lastname}" /></td>
   </tr>
   <tr>
        <td><button type="submit">Insert</button></td>
   </tr>
 </table>
</div>
</body>
</html>
We handle the Form Post in this controller method. The @RequestMapping annotation indicates taking POST's URL /save_employee and the HTTP request method to map it to this controller method.
You can see we paste the "employee" object in @ModelAttribute annotation in this method. Spring MVC will take your form parameters and automatically bind our view to an object called "employee".
I return a string on the last line with "redirect:/". This tells Spring to move to the view to show the created employee after the save action.
@RequestMapping(value = "/save_employee", method = RequestMethod.POST)
public String addNewEmployee(@ModelAttribute("employee") Employee employee) {
 service.create(employee);
 return "redirect:/";
}
Edit employee
You can see a hyperlink within the index.html file which allows you to edit specific employee records.
<td><a th:href="@{'/edit/' + ${employee.id}}">Edit</a></td>The controller method below displays the update form including the existing record from the specific edit Id.
You can see in the method below that we paste object "employee" into annotation @ModelAttribute. Spring MVC will take your form parameters and automatically bind our view to an object called "employee".
In spring the @PathVariable annotation binds the URI template variables to a controller's handler method parameters. A URI template contains the following variables of one or more paths enclosed by braces ({ }).
http://localhost:8080/edit/id
example
http://localhost:8080/edit/2
@RequestMapping("/edit/{id}")
public ModelAndView viewEditEmployeeForm(@PathVariable(name = "id") long id) {

 ModelAndView mav = new ModelAndView("update");
 Employee employee = service.updateid(id);
 mav.addObject("employee", employee);
 return mav;
}
Note: the name of the template variable (between the curly braces) and the name of the parameter should match up.
update.html
This file shows the updating of existing employee records.
Within this file the attribute name "employee" with Thymeleaf th: object attribute will be used in < form >.
<form th:object="${employee}" th:action="@{/save_employee}" method="post">th: action is allocated with the action URL called upon to submit the form. Upon submission of the form, the URL /save_employee can again access the controller class using the following methods.
<!DOCTYPE html>
<html xmlns:th="http://www.thymeleaf.org">
<head>
<meta charset="ISO-8859-1">
<title>Update Employee </title>
</head>
<body>
<div>
 <h1>Employee Edit Form</h1>
 <br/>
 <form th:object="${employee}" th:action="@{/save_employee}" method="post">
 <table border="1">
   <tr>
    <td>Employee Id</td>
    <td><input type="text" th:field="*{id}" readonly="readonly"/></td>
   </tr>
   <tr>
    <td>Employee Firstname</td>
    <td><input type="text" th:field="*{firstname}" /></td>
   </tr>
   <tr>
    <td>Employee Lastname</td>
    <td><input type="text" th:field="*{lastname}" /></td>
   </tr>
   <tr>
        <td><button type="submit">Update</button></td>
   </tr>
 </table>
</div>

</body>
</html>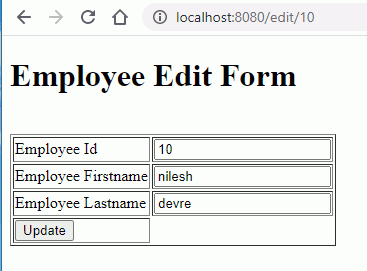
Friends in the method below are the record create method we already discussed above.
@RequestMapping(value = "/save_employee", method = RequestMethod.POST)
public String addNewEmployee(@ModelAttribute("employee") Employee employee) {
 service.create(employee);
 return "redirect:/";
}
Delete Employee
You can see a delete hyperlink in the index.html file which allows the deletion of particular employee records.
<td><a th:href="@{'/delete/' + ${employee.id}}">Delete</a></td>To delete a particular record from a particular delete id by following the controller method.
Method delete() removes the record from the database. I return a string on the last line with "redirect:/". This tells Spring to switch to the default view or index.html file after the delete action is complete.
@RequestMapping("/delete/{id}")
public String deleteEmployee(@PathVariable(name = "id") long id) {

 service.delete(id);
 return "redirect:/";
}
Frequently Asked Questions
What is Thymeleaf?
Thymeleaf is a modern server-side Java template engine for both web and standalone environments. ( Source thymeleaf.org )
That works on the server-side and process XML, HTML, etc. Using Thymeleaf we can bind our class fields to HTML-form elements. In our application, we use Thymeleaf to iterate our java objects.
What is the difference between CrudRepository and JpaRepository?
1. CrudRepository extends the interface to the Repository.
JpaRepository extends PagingAndSortingRepository and QueryByExampleExecutor interface.
2. CrudRepository provides methods for doing CRUD operations.
JpaRepository includes additional methods such as deleteInBatch(), flush(), saveAndFlush(), etc.
3. CrudRepository's saveAll(Iterable < S > entities) method returns Iterable.
The JpaRepository saveAll(Iterable < S > entities) method returns List.


.png)


No comments:
Post a Comment