Hi, In this tutorial I will explain about @SpringBootApplication Annotation
The annotations @Configuration, @EnableAutoConfiguration, and @ComponentScan are coupled to form the annotation @SpringBootApplication.
It serves as the starting point of a Spring Boot application by enabling Spring Boot functionality for a Java class.
Here's an illustration of how to use @SpringBootApplication annotation:
Initialize A New Spring Boot Project
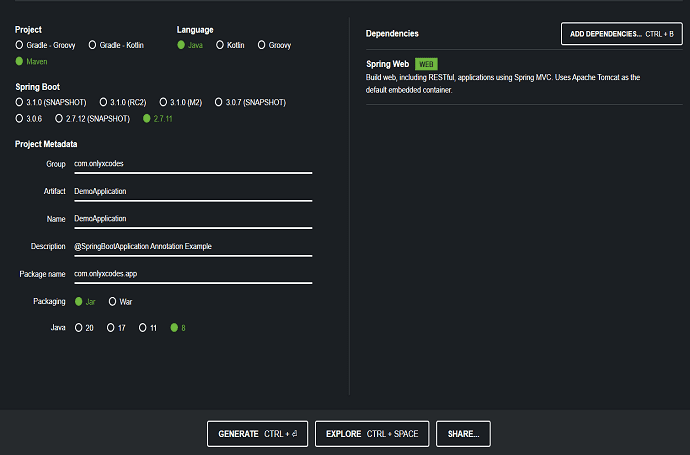
We use the http://start.spring.io/ tool to initialize your new Spring Boot applications first, as shown in the setup and envision below.
Project: Maven
Language: Java
Spring Boot: 2.7.11 (Version)
Project Metadata,
Group: com.onlyxcodes
Artifact: DemoApplication
Description: @SpringBootApplication Annotation Example
Package Name: com.onlyxcodes.app
Packaging: Jar
Java: Java 8
Dependencies: Spring Web
To get the project zip file after configuring the spring boot project, click the GENERATE button.
Next, We can import the Spring Boot Initilizr project into Spring Tool Suite or IntelliJ IDEA Tool from the download folder.
Here look at my whole directory structure, which includes the additional packages.
pom.xml
Spring Boot configures all of our dependencies for us automatically because we made a Maven-based project.
spring-boot-starter-web:- This dependency is usually utilized for building web applications with RESTful APIs using Spring MVC. The typical embedded container is Tomcat.
<?xml version="1.0" encoding="UTF-8"?>
<project xmlns="http://maven.apache.org/POM/4.0.0" xmlns:xsi="http://www.w3.org/2001/XMLSchema-instance"
	xsi:schemaLocation="http://maven.apache.org/POM/4.0.0 https://maven.apache.org/xsd/maven-4.0.0.xsd">
	<modelVersion>4.0.0</modelVersion>
	<parent>
		<groupId>org.springframework.boot</groupId>
		<artifactId>spring-boot-starter-parent</artifactId>
		<version>2.7.11</version>
		<relativePath/> <!-- lookup parent from repository -->
	</parent>
	<groupId>com.onlyxcodes</groupId>
	<artifactId>DemoApplication</artifactId>
	<version>0.0.1-SNAPSHOT</version>
	<name>DemoApplication</name>
	<description>@SpringBootApplication Annotation Example</description>
	<properties>
		<java.version>1.8</java.version>
	</properties>
	<dependencies>
		<dependency>
			<groupId>org.springframework.boot</groupId>
			<artifactId>spring-boot-starter-web</artifactId>
		</dependency>

		<dependency>
			<groupId>org.springframework.boot</groupId>
			<artifactId>spring-boot-starter-test</artifactId>
			<scope>test</scope>
		</dependency>
	</dependencies>

	<build>
		<plugins>
			<plugin>
				<groupId>org.springframework.boot</groupId>
				<artifactId>spring-boot-maven-plugin</artifactId>
			</plugin>
		</plugins>
	</build>

</project>
Create A Controller Class
The "/" ended URLs for HTTP GET requests will be handled by the test() function. It just displays a text message saying "Hello, Welcome to Australia" on the browser.
As a shorthand for @RequestMapping(method = RequestMethod.GET), the @GetMapping annotation is a developed version of the @RequestMapping annotation.
The methods with the annotation @GetMapping handle HTTP GET requests that match the specified URI expression.
To make the process of developing RESTful web services simpler, use the @RestController annotation. It is a useful annotation that combines @Controller and @ResponseBody, obviating the need to add the @ResponseBody annotation to each request-handling function of the controller class.
You may eliminate the need for @ResponseBody in all of the request mapping methods by annotating the controller class with the @RestController annotation. By default, the @ResponseBody annotation is on.
MyController.java
package com.onlyxcodes.app.controller;

import org.springframework.web.bind.annotation.GetMapping;
import org.springframework.web.bind.annotation.RestController;

@RestController
public class MyController {

	@GetMapping("/")
	public String test()
	{
		return "Hello, Welcome to Australia";
	}
}
@SpringBootApplication Annotation Class
The public static void main method is located in the main class for the Spring Boot application.
The DemoApplication class uses the @SpringBootApplication annotation. This annotation informs Spring Boot that this class is where the application's operations start. This class's primary function calls SpringApplication.run() to launch the Spring Boot application.
DemoApplication.java
package com.onlyxcodes.app;

import org.springframework.boot.SpringApplication;
import org.springframework.boot.autoconfigure.SpringBootApplication;

@SpringBootApplication
public class DemoApplication {

	public static void main(String[] args) {
		SpringApplication.run(DemoApplication.class, args);
	}

}
We saw in the introduction that the @EnableAutoConfiguration, @Configuration, and @ComponentScan annotations are merged into one essential annotation called @SpringBootApplication in a Spring Boot application.
@EnableAutoConfiguration:
The @SpringBootApplication annotation makes use of Spring Boot features including auto-configuration, which sets up Spring beans according to the classpath and environment variables.
By assuming the necessary beans are on the classpath and configuring it to run the application, it streamlines the developer's task. The spring boot framework includes the @SpringBootApplication annotation.
@ComponentScan:
Annotations like @Component, @Configuration, @Service, and @Repository usually appear on classes in a Spring application to identify them as Spring beans.
To find annotated classes and configure them as Spring beans, the @ComponentScan annotation instructs Spring Boot to scan the current package and its sub-packages.
The present package is consequently designated as the root package for component scanning.
@Configuration:
Gives the class the designation of Java configuration class.
The application class is turned into a configuration class using @Configuration. Bean definitions can therefore be made in the application class rather than in a separate configuration file.
Some application beans should be defined in the application class itself, according to developers. It can also be utilized to import more configuration classes.
Overall, the @SpringBootApplication annotation is a handy way to make a Java class the beginning point of a Spring Boot application and activate Spring Boot functionality for it.
Run The Application
You should see the Spring Boot logo show when you run the DemoApplication.java class, which contains the main method, and some logging messages printed to the console that looks like this:
.   ____          _            __ _ _
 /\\ / ___'_ __ _ _(_)_ __  __ _ \ \ \ \
( ( )\___ | '_ | '_| | '_ \/ _` | \ \ \ \
 \\/  ___)| |_)| | | | | || (_| |  ) ) ) )
  '  |____| .__|_| |_|_| |_\__, | / / / /
 =========|_|==============|___/=/_/_/_/
[32m :: Spring Boot :: [39m             [2m (v2.7.11)[0;39m

[2m2023-05-07 20:25:25.934[0;39m [32m INFO[0;39m [35m11084[0;39m [2m---[0;39m [2m[           main][0;39m [36mcom.onlyxcodes.app.DemoApplication      [0;39m [2m:[0;39m Starting DemoApplication using Java 17.0.6 on Riyaz with PID 11084 (H:\Hamid\Hamid MCA\java practise\STS\DemoApplication.zip_expanded\DemoApplication\target\classes started by riyaz in H:\Hamid\Hamid MCA\java practise\STS\DemoApplication.zip_expanded\DemoApplication)
[2m2023-05-07 20:25:25.936[0;39m [32m INFO[0;39m [35m11084[0;39m [2m---[0;39m [2m[           main][0;39m [36mcom.onlyxcodes.app.DemoApplication      [0;39m [2m:[0;39m No active profile set, falling back to 1 default profile: "default"
[2m2023-05-07 20:25:26.634[0;39m [32m INFO[0;39m [35m11084[0;39m [2m---[0;39m [2m[           main][0;39m [36mo.s.b.w.embedded.tomcat.TomcatWebServer [0;39m [2m:[0;39m Tomcat initialized with port(s): 8080 (http)
Output:
When you open your browser and enter the URL: http://localhost:8080/, the text "Hello, Welcome to Australia" will appear.
Hello, Welcome to Australia


No comments:
Post a Comment