
Hi, Today I will post a simplistic yet useful tutorial in your web project, Simple Insert Update Delete using JSP and MySQL. The JSP is a Java platform language, that features support to work various types of databases and store various types of data in the database. In this tutorial, I work with a MySQL database.
The extra is that I apply JavaScript validation codes of both insert and update web pages as a result of each field aren't empty using the JavaScript message alert methodology that allows users to simply understand the UI popup window on the top section.
Table Content
1. Tools I Used
2. Database / Table Creation
3. add.jsp
3.1. Customize CSS and JavaScript Validation Code for add page
3.2. JSP Insert Code
4. update.jsp
4.1 Customize CSS and JavaScript Validation Code for update page
4.2 JSP Update Code
5. index.jsp
5.1 Custom CSS Code for index page
6. JSP Delete Code
7. Run Project in XAMPP Server
1. Tools I Used
Notepad++ : - I have to use Notepadd++ editor for creating all codes.
XAMPP:- I establish and execute this project on the XAMPP server.
Jar Files:- jsp-api.jar, servlet-api.jar and mysql-connector-java-5.1.15-bin.jar please download on Google search lot’s of the website provide freely. Using the above jar files to establish a MySQL connection.

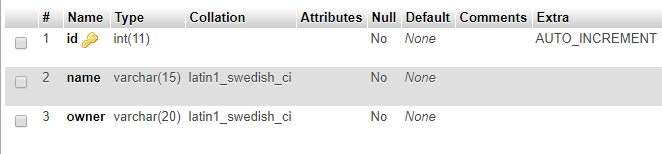
2. Database / Table Creation
Open your localhost server PHPMyAdmin when opening; choose database option and type "demo" for the database name. SQL codes below invoke your PHPMyAdmin when the creation of the "person" table.
CREATE TABLE `person` (
  `id` int(11) NOT NULL,
  `name` varchar(15) NOT NULL,
  `owner` varchar(20) NOT NULL
) ENGINE=InnoDB DEFAULT CHARSET=latin1;
Now we just need to build 3 JSP files that handle MySQL with our insert update delete operation and they are as follows.
1. add.jsp
2. update.jsp
3. index.jsp
3. add.jsp
Simple HTML form created with table and using its attribute, the name and owner of the fields I took here.
 <div class="main">
  <form method="post" name="myform"  onsubmit="return validate();">

   <center>
    <h1>Insert Record</h1>
   <center>

   <table>

    <tr>
     <td> Name <td>
     <td> <input type="text" name="txt_name"> </td>
    </tr>

    <tr>
     <td> Owner <td>
     <td> <input type="text" name="txt_owner"> </td>
    </tr>

    <tr>
     <td> <input type="submit" name="btn_add" value="Insert"> </td>
    </tr>

   </table>

   <center>
    <h1> <a href="index.jsp"> Back </a> </h1>
   </center>

  </form>
</div>
3.1 Customize CSS and JavaScript Validation Code for add page
See below CSS and Javascript codes starting simply over </head> tag on the add page. The vaidate() function of JavaScript assigns to the onsubmit method, and that method trigger event comes in the submission form.
<style type="text/css">

 .main
 {
  width:700px;;
  margin-left:250px;
  padding: 10px;
  border: 5px solid grey;

 }
 table
 {
  font-family: arial, sans-serif;
  border-collapse: collapse;
  width: 600px;
 }
 td
 {
  border: 5px solid silver;
  text-align: left;
  padding: 8px;
 }
 </style>

 <!-- javascript codes for form validation-->
<script>

 function validate()
 {
  var name = document.myform.txt_name;
  var owner = document.myform.txt_owner;

  if (name.value == "")
  {
   window.alert("please enter name ?");
   name.focus();
   return false;
  }
  if (owner.value == "")
  {
   window.alert("please enter owner ?");
   owner.focus();
   return false;
  }
 }

</script>
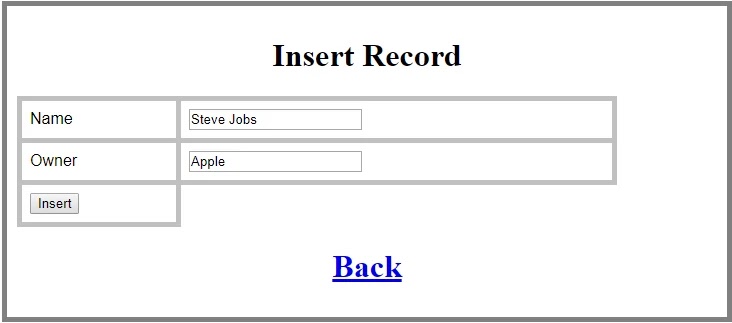
Add This Type Of Form Display :
3.2 JSP Insert Code
By following the JSP code record will be inserted into the database with an appropriate message after the insert query executed.
<%@ page import="java.sql.*" %>

<%
try
{
 Class.forName("com.mysql.jdbc.Driver");  //load driver

 Connection con=DriverManager.getConnection("jdbc:mysql://localhost:3306/demo","root",""); //create connection

 if(request.getParameter("btn_add")!=null) //check button click event not null
 {
  String name,owner;

  name=request.getParameter("txt_name"); //txt_name
  owner=request.getParameter("txt_owner"); //txt_owner

  PreparedStatement pstmt=null; //create statement

  pstmt=con.prepareStatement("insert into person(name,owner) values(?,?)"); //sql insert query
  pstmt.setString(1,name);
  pstmt.setString(2,owner);
  pstmt.executeUpdate(); //execute query

  con.close();  //close connection

  out.println("Insert Successfully...! Click Back link.");// after insert record successfully message

 }

}
catch(Exception e)
{
 out.println(e);
}

%>
4. update.jsp
The editing form is like an insert form. We have to retrieve particular records from a database while editing a record.
<div class="main">
<form method="post" name="myform"  onsubmit="return validate();">

  <center>
   <h1>Update Record</h1>
  </center>

  <table>
  <%
  try
  {
   Class.forName("com.mysql.jdbc.Driver"); //load driver

   Connection con=DriverManager.getConnection("jdbc:mysql://localhost:3306/demo","root",""); // create connection

   if(request.getParameter("edit")!=null)
   {
    int id=Integer.parseInt(request.getParameter("edit"));

    String name,owner;

    PreparedStatement pstmt=null; // create statement

    pstmt=con.prepareStatement("select * from person where id=?"); // sql select query
    pstmt.setInt(1,id);
    ResultSet rs=pstmt.executeQuery(); // execute query store in resultset object rs.

    while(rs.next())
    {
     id=rs.getInt(1);
     name=rs.getString(2);
     owner=rs.getString(3);
   %>
   <tr>
    <td>Name</td>
    <td><input type="text" name="txt_name" value="<%=name %>"></td>
   </tr>

   <tr>
    <td>Owner</td>
    <td><input type="text" name="txt_owner" value="<%=owner %>"></td>
   </tr>

   <tr>
    <td><input type="submit" name="btn_update" value="Update"></td>
   </tr>

    <input type="hidden" name="txt_hide" value="<%=id %>">
  <%
    }
   }
  }
  catch(Exception e)
  {
   out.println(e);
  }
  %>
  </table>

  <center>
    <h1><a href="index.jsp">Back</a></h1>
  </center>

 </form>
</div>
4.1 Customize CSS and JavaScript Validation Code for update page
I said edit form codes for CSS and JavaScript are constantly the same as the add page. Thus just copy and paste before tag < /head>.
<style type="text/css">

 .main
 {
  width:700px;;
  margin-left:250px;
  padding: 10px;
  border: 5px solid grey;

 }
 table
 {
  font-family: arial, sans-serif;
  border-collapse: collapse;
  width: 600px;
 }
 td
 {
  border: 5px solid silver;
  text-align: left;
  padding: 8px;
 }
</style>

 <!-- javascript for form validation-->
<script>

 function validate()
 {
  var name = document.myform.txt_name;
  var owner = document.myform.txt_owner;

  if (name.value == "")
  {
   window.alert("please enter name ?");
   name.focus();
   return false;
  }
  if (owner.value == "")
  {
   window.alert("please enter owner ?");
   owner.focus();
   return false;
  }
 }

</script>
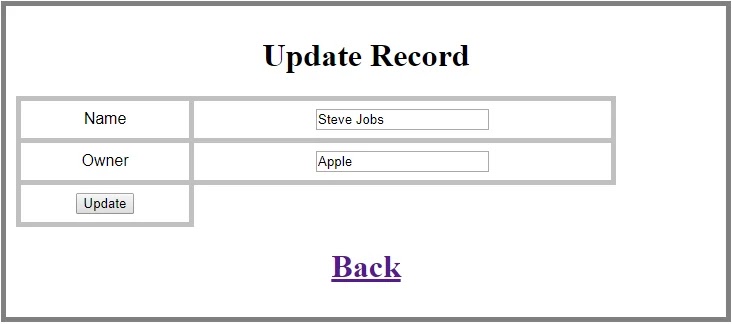
Showing this type of update form :
4.2 JSP Update Code
Fire update query, if a record is selected to edit then delete old records and insert new records.
<%@ page import="java.sql.*" %>

<%
try
{
 Class.forName("com.mysql.jdbc.Driver");  //load driver

 Connection con=DriverManager.getConnection("jdbc:mysql://localhost:3306/demo","root",""); // create connection

 if(request.getParameter("btn_update")!=null) //check button click event not null
 {
  int hide;

  String name_up,owner_up;

  hide=Integer.parseInt(request.getParameter("txt_hide")); //it is hidden id get for update record
  name_up=request.getParameter("txt_name");  //txt_name
  owner_up=request.getParameter("txt_owner"); //txt_owner

  PreparedStatement pstmt=null; //create statement

  pstmt=con.prepareStatement("update person set name=?, owner=? where id=?"); //sql update query
  pstmt.setString(1,name_up);
  pstmt.setString(2,owner_up);
  pstmt.setInt(3,hide);
  pstmt.executeUpdate(); //execute query

  con.close(); //connection close

  out.println("Update Successfully...! Click Back link."); //after update record successfully message
 }

}
catch(Exception e)
{
 out.println(e);
}

%>
5. index.jsp
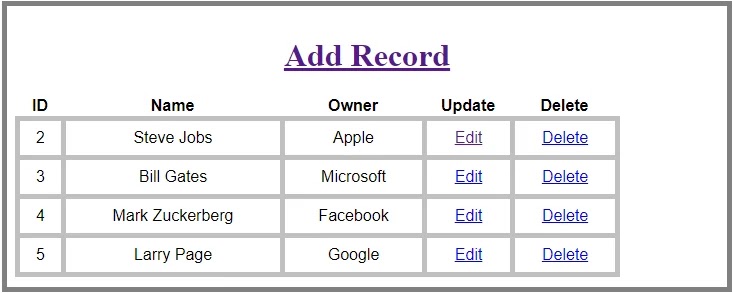
All records are retrieved by JSP expression and embedded within a table.
<div class="main">
   <center>
    <h1> <a href="add.jsp">Add Record</a></h1>
   </center>

  <table>

   <tr>
    <th>ID</th>
    <th>Name</th>
    <th>Owner</th>
    <th>Update</th>
    <th>Delete</th>
   </tr>
  <%

  try
  {
   Class.forName("com.mysql.jdbc.Driver");  //load driver

   Connection con=DriverManager.getConnection("jdbc:mysql://localhost:3306/demo","root","");  //creat connection

   PreparedStatement pstmt=null; //create statement

   pstmt=con.prepareStatement("select * from person"); //sql select query

   ResultSet rs=pstmt.executeQuery(); //execute query and set in resultset object rs.

   while(rs.next())
   {
  %>
    <tr>
     <td> <%=rs.getInt(1)%> </td>
     <td> <%=rs.getString(2)%> </td>
     <td> <%=rs.getString(3)%> </td>

     <td> <a href="update.jsp?edit=<%=rs.getInt(1)%> ">Edit</a> </td>
     <td> <a href="?delete=<%=rs.getInt(1)%> ">Delete</a> </td>

    </tr>
  <%
   }

  }
  catch(Exception e)
  {
   out.println(e);
  }

  %>

  </table>

</div>
5.1 Custom CSS Code for index page
Well, it is easy to set up records in table format using simple CSS codes below.
<style type="text/css">

 .main
 {
  width:700px;;
  margin-left:250px;
  padding: 10px;
  border: 5px solid grey;

 }
 table
 {
  font-family: arial, sans-serif;
  border-collapse: collapse;
  width: 600px;
 }
 td
 {
  border: 5px solid silver;
  text-align: center;
  padding: 8px;
 }
</style>
Show All Record In This Type :
6. JSP Delete Code
Now put the following delete codes just above <html> tag within "index.jsp" page. After delete query execute the data will be deleted from the database.
<%@page import="java.sql.*" %>

<%
try
{
 Class.forName("com.mysql.jdbc.Driver");  //load driver

 Connection con=DriverManager.getConnection("jdbc:mysql://localhost:3306/demo","root","");  //create connection

 if(request.getParameter("delete")!=null)
 {
  int id=Integer.parseInt(request.getParameter("delete"));

  PreparedStatement pstmt=null; //create statement

  pstmt=con.prepareStatement("delete from person where id=? "); //sql delete query
  pstmt.setInt(1,id);
  pstmt.executeUpdate(); //execute query

  con.close(); //close connection
 }
}
catch(Exception e)
{
 out.println(e);
}
%>
7. Run Project in XAMPP Server
Start the XAMPP server and click on Apache, MySQL and Tomcat button to start whole services.
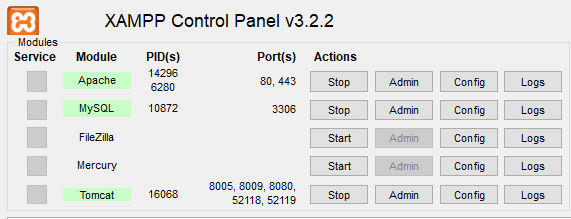
Open your web browser type http://localhost:8080/Jsp-Insert-Update-Delete-MySQL. Enjoy insert update delete example using JSP and MySQL. Thank you.
Learn More:
Login and Register JSP MySQL Example
How to Display Data from Database in Modal using JSP
How to call Java Class from JSP Page in Eclipse
Json Encode In JSP - MySQL Data Encode In Json Example
Role Based Access Control in Java Web Application Example
Download Codes


.png)


Thanks Lot :)
ReplyDeleteThanks ASHIF keep visiting
DeleteHi,but why it show me http status 404-not found
ReplyDeletemake sure to create properly all files, codes and set up projects inside in xampp/tomcat/webapp folder.
ReplyDeleteThanks to you sheikh
ReplyDeleteWelcome Sire Siddique Keep Visiting
Delete