
In this tutorial, I produce to create Consume Restful Webservice in Java. I assume you're familiar with the term Rest API. Now present time the Rest API is the most popular approach for implementing in modern application to consume clients or any resource request.
Below in this application, I create Rest API or end URL and handle the simple request of Creating, Reading, Updating, Deleting by a client, or user. They manage whole requests using a method of the HTTP protocol.
Here I am working from the localhost server of Apache Tomcat so I will provide a visual images demonstration of how I fulfill client requests from the localhost server and submit JSON response. I check this application fully in a postman tool and include a detailed step-by-step guide to the testing procedure.
These tutorial codes are very easy to use and fill in any resource request in your Java business application, let's dive into it.

What is Consume or Consuming Webservice ?
Web services Consume or Consuming simply means we have developed web services that are used in our application, such as Java, ASP.net, PHP, etc.
For Example,
This tutorial created its Restful Web Services and that Web Service Consuming or Calling in Java Application. This web service acquires client requests and uses an HTTP protocol method to successfully fulfill the response by Rest API.
Database and Table
This is our sample database and a table with dumping data called 'tbl_user' contains a username and owner so just invoke this SQL code into your PhpMyAdmin.
--
-- Database: `java_consume_webservice_db`
--

-- --------------------------------------------------------

--
-- Table structure for table `tbl_user`
--

CREATE TABLE `tbl_user` (
  `id` int(11) NOT NULL,
  `username` varchar(15) NOT NULL,
  `owner` varchar(15) NOT NULL
) ENGINE=InnoDB DEFAULT CHARSET=latin1;

--
-- Dumping data for table `tbl_user`
--

INSERT INTO `tbl_user` (`id`, `username`, `owner`) VALUES
(1, 'Steve Jobs', 'Apple'),
(2, 'Lary Page', 'Google');
Create New Maven Project
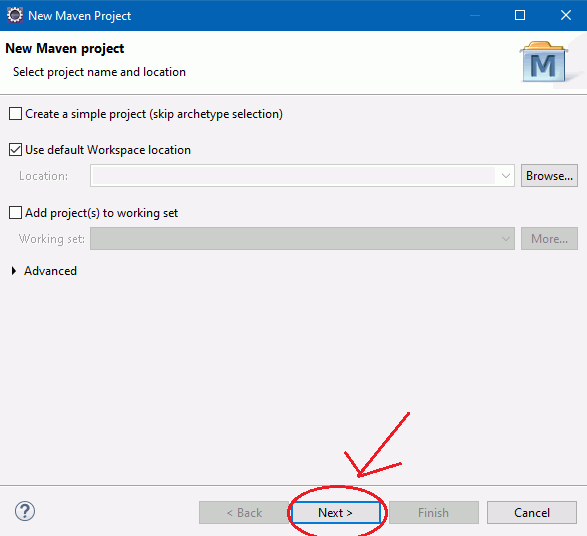
Launch eclipse and select File – New – Maven Project to go to the top section.
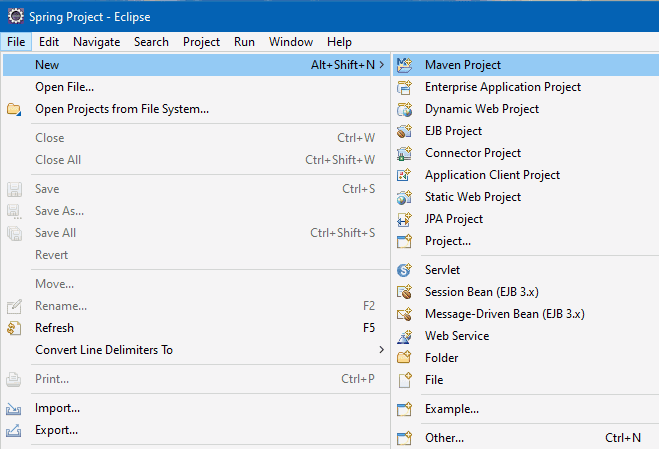
Press the Next button to see a new maven project window open.
Again new Maven window open of Archetype. Drop down and select org.glassfish.jersey.archetypes jersey-quickstart-webapp 2.26.

Note – Click on the Add Archetype button when not found.
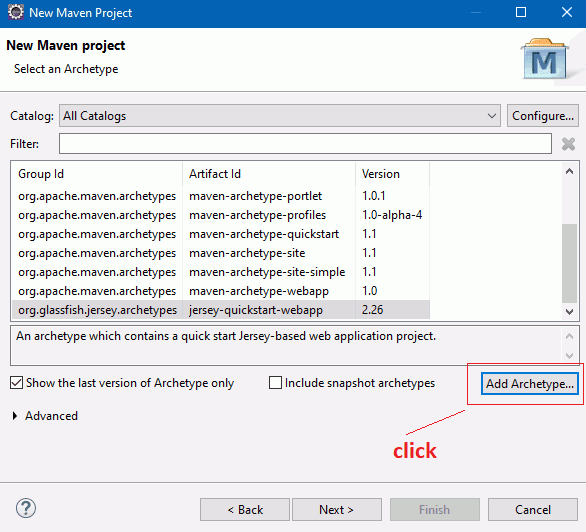
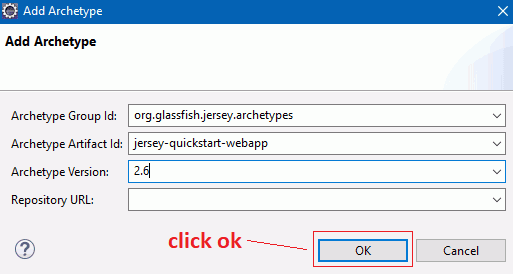
Add Archetype to the new description below.
Archetype Group Id : org.glassfish.jersey.archetypes
Archetype Artifact Id: jersey-quickstart-webapp
Archetype Version: 2.6
Click to the OK button.
Drop-down again and select org.glassfish.jersey.archetypes jersey-quickstart-webapp 2.26 and click the Next button.
See the new maven project name window open. Type below the new project summary and press finish button.
Group Id: com.onlyxcodes
Artifact Id: JavaConsumeWebservice

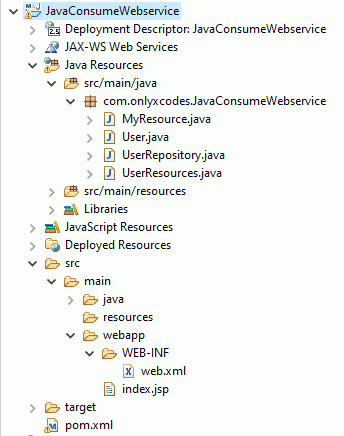
See the complete directory structure below, as well as extra classes that we are going to build in this tutorial.
pom.xml
Friends we are using a maven project to specify under that file the required maven dependencies.
<project xmlns="http://maven.apache.org/POM/4.0.0" xmlns:xsi="http://www.w3.org/2001/XMLSchema-instance"
         xsi:schemaLocation="http://maven.apache.org/POM/4.0.0 http://maven.apache.org/maven-v4_0_0.xsd">

    <modelVersion>4.0.0</modelVersion>

    <groupId>com.onlyxcodes</groupId>
    <artifactId>JavaConsumeWebservice</artifactId>
    <packaging>war</packaging>
    <version>0.0.1-SNAPSHOT</version>
    <name>JavaConsumeWebservice</name>

    <build>
        <finalName>JavaConsumeWebservice</finalName>
        <plugins>
            <plugin>
                <groupId>org.apache.maven.plugins</groupId>
                <artifactId>maven-compiler-plugin</artifactId>
                <version>2.5.1</version>
                <inherited>true</inherited>
                <configuration>
                    <source>1.7</source>
                    <target>1.7</target>
                </configuration>
            </plugin>
        </plugins>
    </build>

    <dependencyManagement>
        <dependencies>
            <dependency>
                <groupId>org.glassfish.jersey</groupId>
                <artifactId>jersey-bom</artifactId>
                <version>${jersey.version}</version>
                <type>pom</type>
                <scope>import</scope>
            </dependency>
        </dependencies>
    </dependencyManagement>

    <dependencies>
        <dependency>
            <groupId>org.glassfish.jersey.containers</groupId>
            <artifactId>jersey-container-servlet-core</artifactId>
            <!-- use the following artifactId if you don't need servlet 2.x compatibility -->
            <!-- artifactId>jersey-container-servlet</artifactId -->
        </dependency>
        <dependency>
            <groupId>org.glassfish.jersey.inject</groupId>
            <artifactId>jersey-hk2</artifactId>
        </dependency>

        <dependency>
   <groupId>org.glassfish.jersey.media</groupId>
   <artifactId>jersey-media-json-binding</artifactId>
   <version>2.27</version>
  </dependency>

  <dependency>
      <groupId>mysql</groupId>
      <artifactId>mysql-connector-java</artifactId>
      <version>5.1.38</version>
  </dependency>
    </dependencies>
    <properties>
        <jersey.version>2.26</jersey.version>
        <project.build.sourceEncoding>UTF-8</project.build.sourceEncoding>
    </properties>
</project>
User.java
Build a class of beans called User. In this class, we privately define the entity property and by setter and getter method we implement public.
package com.onlyxcodes.JavaConsumeWebservice;

public class User
{
 private int id;

 private String username, owner;

 public int getId() {
  return id;
 }
 public void setId(int id) {
  this.id = id;
 }
 public String getUsername() {
  return username;
 }
 public void setUsername(String username) {
  this.username = username;
 }
 public String getOwner() {
  return owner;
 }
 public void setOwner(String owner) {
  this.owner = owner;
 }

}
UserRepository.java
This class fulfills the requirement of the client or user to build create, read, update, delete below 5 methods from the database.
First of all, we create a constructor in this class, and then we set up a MySQL database connection within the constructor.
displayUser() – This method displays database or server records of all clients.
createUser() – This method creates new records of clients or users in databases.
getUserId() – This method is used to select a specific user or client Id.
updateUser() – This method updates current records on a particular client.
deleteUser() – Last this method of deleting records of specific users or clients.
package com.onlyxcodes.JavaConsumeWebservice;

import java.sql.Connection;
import java.sql.DriverManager;
import java.sql.PreparedStatement;
import java.sql.ResultSet;
import java.util.ArrayList;
import java.util.List;

public class UserRepository
{
 Connection con = null;
 PreparedStatement pstmt = null;

 public UserRepository()
 {
  String url="jdbc:mysql://localhost:3306/java_consume_webservice_db";
  String username="root";
  String password="";

  try
  {
   Class.forName("com.mysql.jdbc.Driver");
   con = DriverManager.getConnection(url,username,password);
  }
  catch(Exception e)
  {
   System.out.println(e);
  }
 }

 public List<User> displayUser()
 {
  List<User> user = new ArrayList<>();

  try
  {
   pstmt=con.prepareStatement("SELECT * FROM tbl_user");
   ResultSet rs=pstmt.executeQuery();
   while(rs.next())
   {
    User u = new User();
    u.setId(rs.getInt("id"));
    u.setUsername(rs.getString("username"));
    u.setOwner(rs.getString("owner"));

    user.add(u);
   }
  }
  catch(Exception e)
  {
   System.out.println(e);
  }

  return user;
 }
 public void createUser(User user)
 {
  try
  {
   pstmt=con.prepareStatement("INSERT INTO tbl_user (id,username,owner) VALUES (?,?,?)");
   pstmt.setInt(1, user.getId());
   pstmt.setString(2, user.getUsername());
   pstmt.setString(3, user.getOwner());
   pstmt.executeUpdate();
  }
  catch(Exception e)
  {
   System.out.println(e);
  }
 }
 public User getUserId(int id)
 {
  User user = new User();
  try
  {
   pstmt=con.prepareStatement("SELECT * FROM tbl_user WHERE id=? ");
   ResultSet rs=pstmt.executeQuery();
   if(rs.next())
   {
    user.setId(rs.getInt("id"));
    user.setUsername(rs.getString("username"));
    user.setOwner(rs.getString("owner"));
   }
  }
  catch(Exception e)
  {
   System.out.println(e);
  }

  return user;
 }

 public void updateUser(User user)
 {
  try
  {
   pstmt=con.prepareStatement("UPDATE tbl_user SET username=?, owner=? WHERE id=?");
   pstmt.setString(1, user.getUsername());
   pstmt.setString(2, user.getOwner());
   pstmt.setInt(3, user.getId());
   pstmt.executeUpdate();
  }
  catch(Exception e)
  {
   System.out.println(e);
  }
 }
 public void deleteUser(int id)
 {
  try
  {
   pstmt=con.prepareStatement("DELETE FROM tbl_user WHERE id=?");
   pstmt.setInt(1, id);
   pstmt.executeUpdate();
  }
  catch(Exception e)
  {
   System.out.print(e);
  }
 }
}
UserResources.java
We create Consuming Restful web-service in this class. This class plays the job of recognizing and responding to the client request from the REST API URL or end URL.
Within this class, we import UserRepository class and we call every method of that class using that class object urr.
By following the HTTP method we send CRUD (Create, Read, Update, Delete) response to the client.
@GET – This method used to obtain the data equivalent to Reading.
@POST – uses this to create new record equivalent to CREATE
@PUT – using that to updating existing data equivalent to Update
@DELETE – by this method to deleting data equivalent to Delete
Some other method guide :
@Path – used to specify the class and method level path annotation.
@Produces and @Consumes – used to send a response in JSON format or XML format.
@PathParam – using that to include the value of Rest API URL parameter that define in the @Path method we are using in the Java method.
See the REST API URL that we are creating that works with the HTTP method to Consume Restful WebService from clients.
| Rest API URL | HTTP Method | Description |
|---|---|---|
| /webapi/usres | GET | Display all client records |
| /webapi/users/createuser | POST | Creating new client records on a database |
| /webapi/users/updateuser | PUT | Update particular client existing record |
| /webapi/users/user/{id} | GET | Get specific client "id" |
| /webapi/users/user/{id} | GET | Delete particular client record using "id" from end URL |
Note – friends webapi is url-pattern that mapping from web.xml file this tag <url-pattern> /webapi/* </url-pattern>.
Second here we specify the class level path annotation @Path(“users”), so REST API must begin with http://localhost:8080/JavaConsumeWebservice/webapi/users
package com.onlyxcodes.JavaConsumeWebservice;

import java.util.List;

import javax.ws.rs.Consumes;
import javax.ws.rs.DELETE;
import javax.ws.rs.GET;
import javax.ws.rs.POST;
import javax.ws.rs.PUT;
import javax.ws.rs.Path;
import javax.ws.rs.PathParam;
import javax.ws.rs.Produces;
import javax.ws.rs.core.MediaType;

@Path("users")
public class UserResources
{
 UserRepository urr = new UserRepository();

 @GET
 @Produces(MediaType.APPLICATION_JSON)
 public List<User> getUser()
 {
  return urr.displayUser();
 }

 @POST
 @Path("createuser")
 @Consumes(MediaType.APPLICATION_JSON)
 public User create(User u)
 {
  urr.createUser(u);
  return u;
 }

 @GET
 @Path("user/{id}")
 @Produces(MediaType.APPLICATION_JSON)
 public User getSpecificUser(@PathParam("id") int id)
 {
  return urr.getUserId(id);
 }

 @PUT
 @Path("updateuser")
 @Consumes(MediaType.APPLICATION_JSON)
 public User update(User u)
 {
  urr.updateUser(u);
  return u;
 }

 @DELETE
 @Path("user/{id}")
 public User kill(@PathParam("id") int id)
 {
  User user = urr.getUserId(id);

  urr.deleteUser(id);

  return user;
 }
}
web.xml
This is our web.xml file which contains the necessary utility tag for the servlet.
<?xml version="1.0" encoding="UTF-8"?>
<!-- This web.xml file is not required when using Servlet 3.0 container,
see implementation details http://jersey.java.net/nonav/documentation/latest/jax-rs.html -->
<web-app version="2.5" xmlns="http://java.sun.com/xml/ns/javaee" xmlns:xsi="http://www.w3.org/2001/XMLSchema-instance" xsi:schemaLocation="http://java.sun.com/xml/ns/javaee http://java.sun.com/xml/ns/javaee/web-app_2_5.xsd">
<servlet>
<servlet-name>Jersey Web Application</servlet-name>
<servlet-class>org.glassfish.jersey.servlet.ServletContainer</servlet-class>
<init-param>
<param-name>jersey.config.server.provider.packages</param-name>
<param-value>com.onlyxcodes.JavaConsumeWebservice</param-value>
</init-param>
<load-on-startup>1</load-on-startup>
</servlet>
<servlet-mapping>
<servlet-name>Jersey Web Application</servlet-name>
<url-pattern>/webapi/*</url-pattern>
</servlet-mapping>
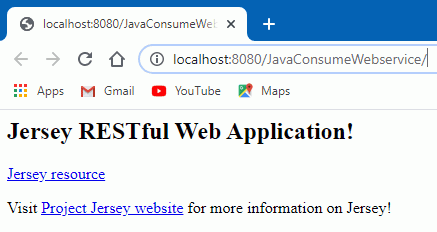
</web-app>OK friends, we invoke the application see a display below by default jersey description message. But avoid that we create our REST API URL.
Go to Postman tool else install chrome extension also available.
Below I demonstrate all the visual images of how I implement clients to Consume Restful WebService.
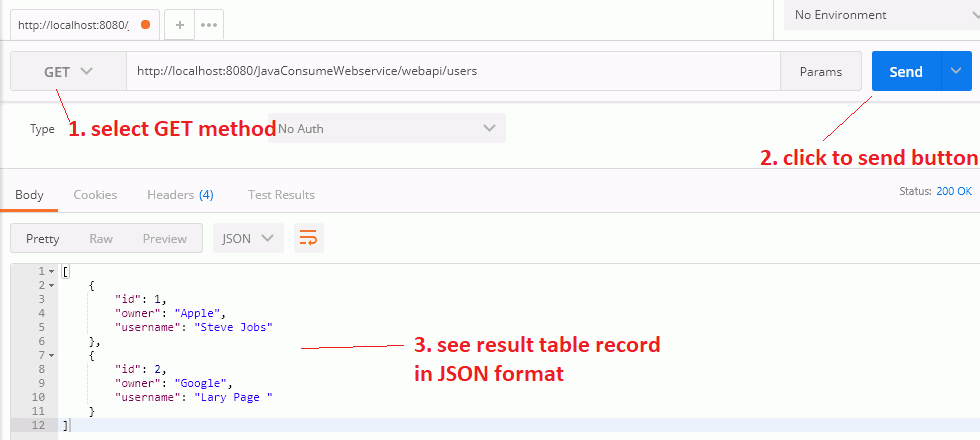
1. Read Clients Records
First, we use this URL http:/localhost:8080/JavaConsumeWebservice /webapi/users to retrieve all the client's data. Select the GET method, and then click the Send button.
2. Create New Client Record
Next, we see Java call Rest API Post example.
Use this URL to create new client or user http:/localhost:8080/JavaConsumeWebservice/webapi/users/createuser
1. selecting the POST method
2. selecting the raw radio button in the Body tab
3. setting Content-Type=”application/json” in Header Tab
And Pasting the following JSON code.
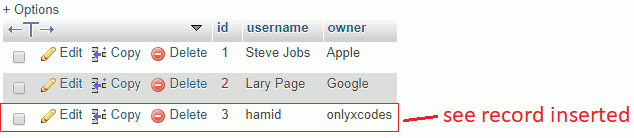
Note: The 2 dumping records already available in the database, I have 3 Id number record inserted so I take 3 ids in JSON code.
{
 "id" : "3"
 "username": "hamid"
 "owner" : "onlyxcode"
}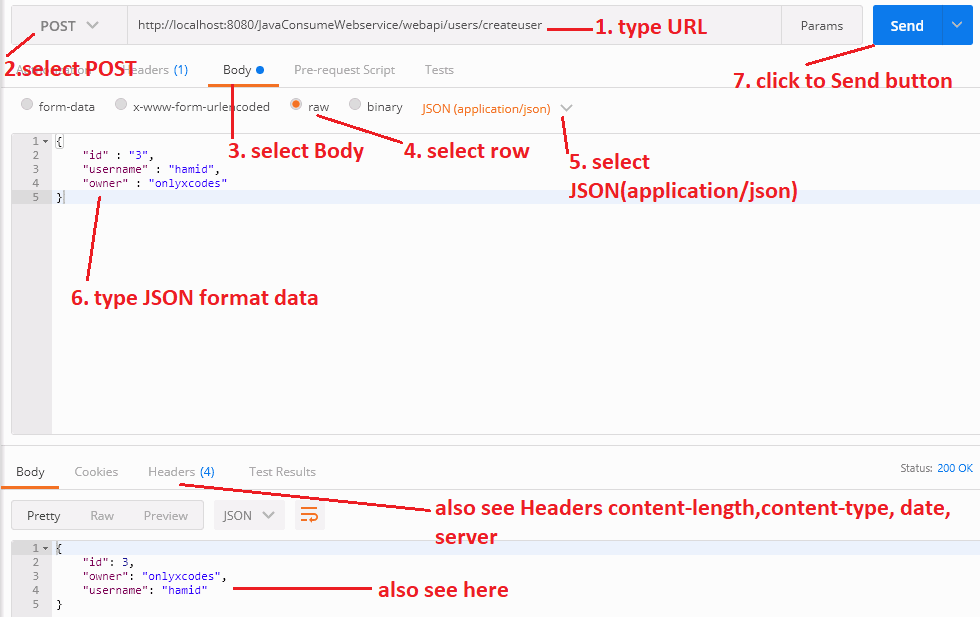
See also a new record of clients created in the table.
3. Update Existing Client Records
We update the existing client record using this URL http://localhost:8080/JavaConsumeWebservice/webapi/users/updateuser
1. selecting the PUT method.
2. select the raw radio button in the Body tab.
3. setting Content-Type=”application/json” in Header Tab.
And then paste the below JSON code.
Note: I update 3 id records of the table so that I take 3 ids in JSON codes.
{
 "id" : "3"
 "username": "Bill"
 "owner" : "Microsoft"
}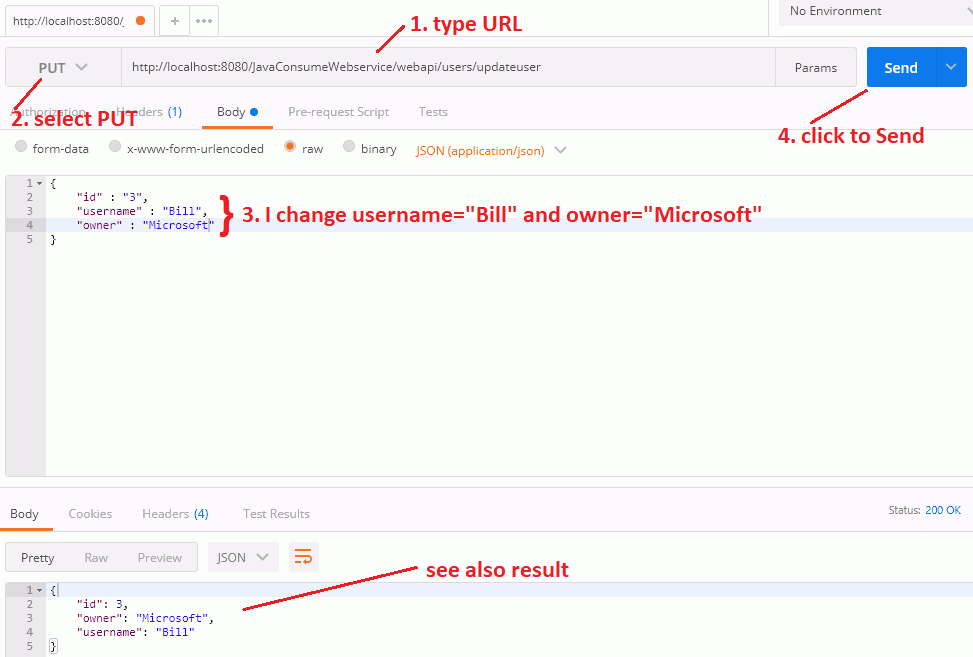
See also the updating of existing records on the database table.

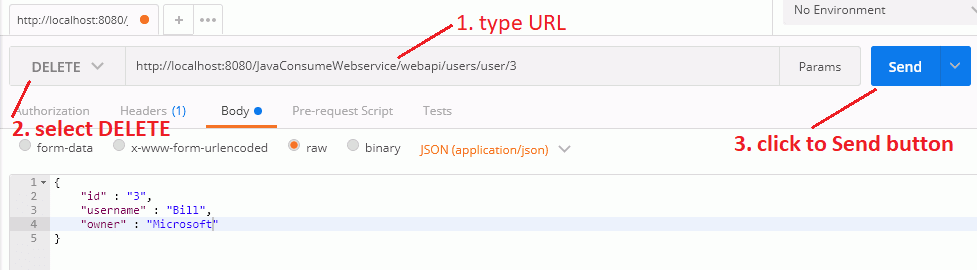
4. Delete Client Records
Finally we delete the specific client record by this URL http:/localhost:8080/JavaConsumeWebservice/webapi/users/user/3.
Select Method DELETE, and hit the send button.
Note: Your table Id is the end of URL 3 Because I would like to delete 3 Id number records.
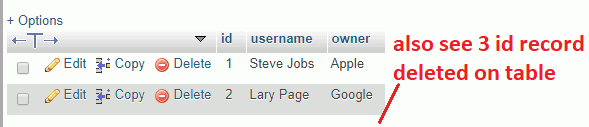
See also the deletion of records on the database table.
Read Also:
What does double mean in Java
How to Remove a Character from a String in Java
How do you define a method in Java?
What do the replaceAll () do in Java?
Can I use LeetCode for Java?
How to Get the Length of a String in Java
How to make lists of lists in Java?
How to print each word in new line in Java
Why do we use :: (double colon) in Java
What is the Difference Between NoClassDefFoundError and ClassNotFoundException in Java
How to Replace a Character in a String in Java without using the Replace Method
What are Variable Arguments in Java
Context Switching in Java Thread Example
Java Stream Iterate Example
What Are the 4 types of loops in Java
How to Run Package Program in Java using Command Prompt
What is final class and method in Java
What is Encapsulation in Java with Realtime Example
3 Ways to Create Thread in Java
Java Code to Send Email with Attachment
Download Codes


.png)


I found a bug in getUserId(int id) method of class UserRepository. Please add "pstmt.setInt(1, id);" as shown below to fix that issue.
ReplyDeletepublic User getUserId(int id) {
User user = new User();
try {
pstmt = con.prepareStatement("SELECT * FROM tbl_user WHERE id=?");
pstmt.setInt(1, id);
No, my code working perfectly, your code few different.
DeleteAfter executing query, Look I retrieving all record from table with proper assignment type int and string.
public User getUserId(int id)
{
User user = new User();
try
{
pstmt=con.prepareStatement("SELECT * FROM tbl_user WHERE id=? ");
ResultSet rs=pstmt.executeQuery();
if(rs.next())
{
user.setId(rs.getInt("id"));
user.setUsername(rs.getString("username"));
user.setOwner(rs.getString("owner"));
}
}
catch(Exception e)
{
System.out.println(e);
}
return user;
}