
In this tutorial, you'll learn how to use a Spring Boot application to communicate to a MongoDB database.
I'll show you how to use MongoDB to create a REST API that does CRUD (Create, Read, Update, and Delete) operations inside a spring boot application.
The tutorial starts with Spring Initializr to create a new spring boot application and ends with Postman Tool to test the REST API.
This post walks you through each section, including visual screenshots of API testing and code explanations. Let's get started.

Table Content
1. What is MongoDB?
2. About MongoDB Compass
3. Required Tools
4. Create Database And Collection In MongoDB Compass
5. Bootstrap New Application With Spring Initializr
6. The pom.xml File
7. Configure MongoDB Database
8. Create A Model Class
9. Create A Repository Interface
10. Create A Controller
11. Spring Boot Main Class
12. The APIs We Created
13. Test API
1. What is MongoDB?
MongoDB is a document-oriented NoSQL database for storing large amounts of data. MongoDB stores data in collections and documents rather than tables of rows and columns, as SQL databases do.
Collections (similar to Tables) include groups of Documents, and Documents are made up of key-value pairs, which are MongoDB's fundamental storage structure.
In MongoDB, each record is a document described in BSON (Binary Javascript Object Notation), which is similar to JSON. Your application can use BSON to retrieve document information in JSON format.
2. About MongoDB Compass
Using the MongoDB Compass GUI, we can easily generate, add, or delete data, as well as visualize, examine, and optimize it, rather than using the command line.
MongoDB Compass is a free and open-source database management system that runs on macOS, Windows, and Linux.
3. Required Tools
Java 8 – I used JDK 8.
MongoDB and MongoDB Compass – You must have MongoDB and Compass installed on your system to test the examples.
STS 4 (Spring Tools Suite) – I developed this application in the STS 4 version editor.
Postman Tool – I tested all REST API in the Postman tool.
The postman tool is now accessible as a Google Chrome web browser extension, which you may install and test.
4. Create Database And Collection In MongoDB Compass
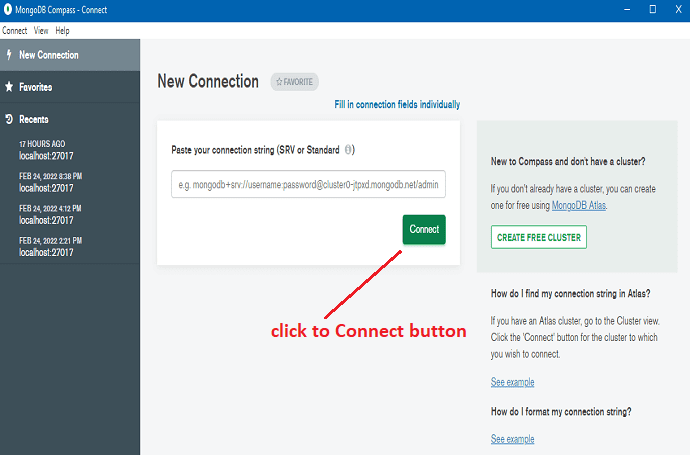
To connect to the MongoDB database, open your Compass and click the connect button.
Click on the Create database button.
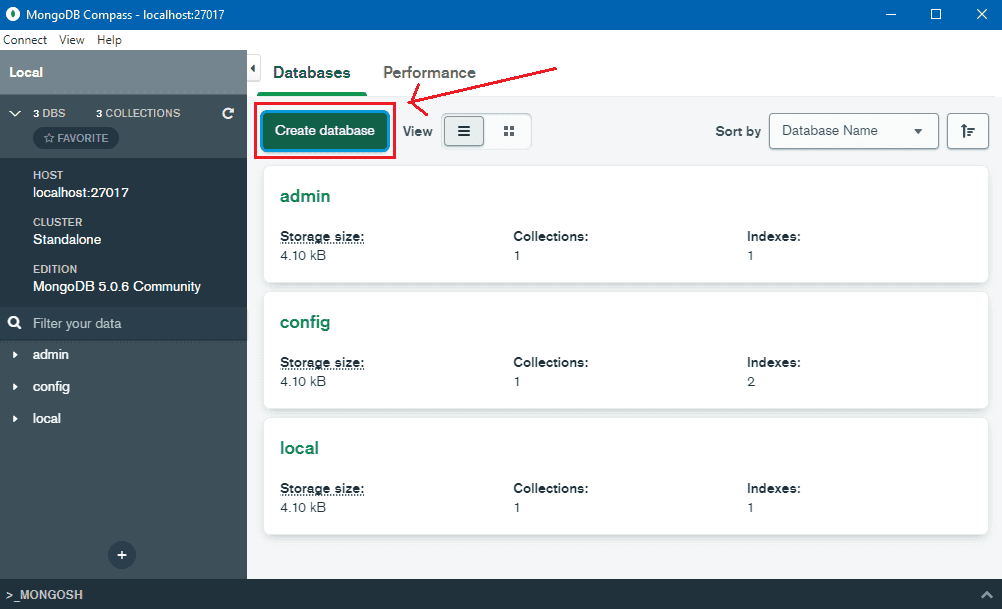
After pressing the Create database button, a popup window appears.
Click the Create Database button after entering the Database Name and Collection Name. Look below I mentioned screenshots.
I used the spring_boot_crud_db named database and student named collection in this example.

We will perform the CRUD operations on the Student collection.
5. Bootstrap New Application With Spring Initializr
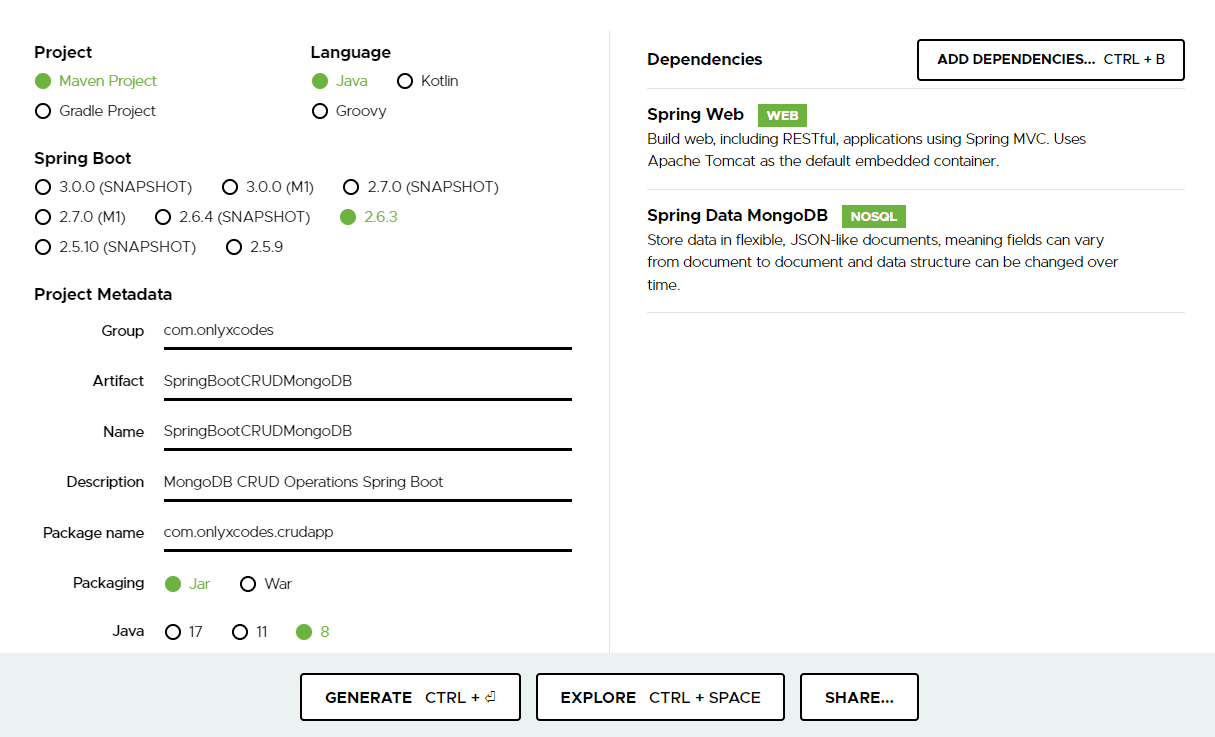
Step 1 – Spring Initializr makes it simple to get a new Spring Boot application up and running. Change the choices to something like this.
1. Select Maven Project
2. Select Java language
3. Select 2.63 Spring Boot Version
Friends above three-step are selected by default by the spring initializer. However, if the spring initializer refreshes the site, the spring boot version may change.
4. Let's fill up all Project Metadata Fields
Group – com.onlyxcodes. It is a common package name.
Artifact – SpringBootCRUDMongoDB. This is our project name.
Description – MongoDB CRUD Operations Spring Boot
Package Name – com.onlyxcodes.crudapp. We use this package to bootstrap various other packages and run our application.
Packaging – Select Jar. It's include needed jar files.
Java – I chose Java 8, but you may also choose versions 11 and 17 if you have them installed on your computer.
5. The ADD DEPENDENCIES button is found in the right-hand sidebar click on it.
After opening a custom window, look for and include the Spring Web and Spring Data MongoDB dependencies.
6. Finally, in the bottom section, click the GENERATE button to download the project zip file automatically.
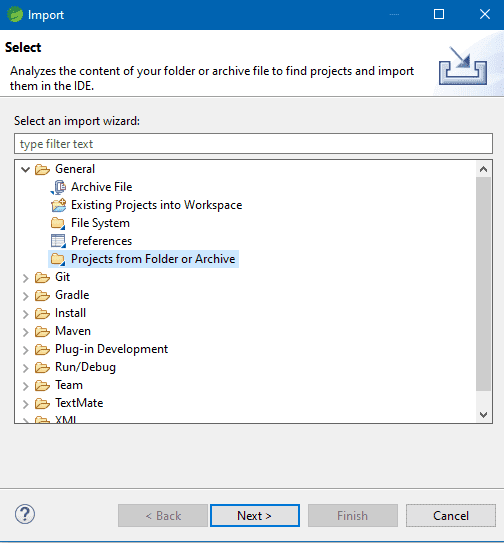
Step 2 – Begin using the Spring Too Suite editor. Go to File and select the Import option as shown in the diagram.

Step 3 – To see the Open custom window, select Projects from Folder or Archive.
Step 4 – Click the Archive button on the right-hand sidebar to see the custom window open once again.

Step 5 – From the download folder's directory, select the SpringBootCRUDMongoDB project zip file.

Step 6 – See the project's imported zip file. The SpringBootCRUDMongoDB.zip expanded checkbox should be unchecked because it isn't required. Select the Finish button.

The project's whole directory structure, including other packages that we will build in this application, is shown below.

6. The pom.xml File
pom.xml
This is the pom.xml file that contains the application's needed dependencies.
When we bootstrapped our project, the maven installed our required Spring Web and MongoDB dependencies.
Maven also fulfills the other dependencies in the pom.xml file automatically.
<?xml version="1.0" encoding="UTF-8"?>
<project xmlns="http://maven.apache.org/POM/4.0.0" xmlns:xsi="http://www.w3.org/2001/XMLSchema-instance"
	xsi:schemaLocation="http://maven.apache.org/POM/4.0.0 https://maven.apache.org/xsd/maven-4.0.0.xsd">
	<modelVersion>4.0.0</modelVersion>
	<parent>
		<groupId>org.springframework.boot</groupId>
		<artifactId>spring-boot-starter-parent</artifactId>
		<version>2.6.3</version>
		<relativePath/> <!-- lookup parent from repository -->
	</parent>
	<groupId>com.onlyxcodes</groupId>
	<artifactId>SpringBootCRUDMongoDB</artifactId>
	<version>0.0.1-SNAPSHOT</version>
	<name>SpringBootCRUDMongoDB</name>
	<description>MongoDB CRUD Operations Spring Boot</description>
	<properties>
		<java.version>1.8</java.version>
	</properties>
	<dependencies>
		<dependency>
			<groupId>org.springframework.boot</groupId>
			<artifactId>spring-boot-starter-data-mongodb</artifactId>
		</dependency>
		<dependency>
			<groupId>org.springframework.boot</groupId>
			<artifactId>spring-boot-starter-web</artifactId>
		</dependency>

		<dependency>
			<groupId>org.springframework.boot</groupId>
			<artifactId>spring-boot-starter-test</artifactId>
			<scope>test</scope>
		</dependency>
	</dependencies>

	<build>
		<plugins>
			<plugin>
				<groupId>org.springframework.boot</groupId>
				<artifactId>spring-boot-maven-plugin</artifactId>
			</plugin>
		</plugins>
	</build>

</project>
7. Configure MongoDB Database
application.properties
To use the MongoDB and Spring Boot application for CRUD operations, simply configure the connection in the application.properties file as shown below.
Mongo DB is configured to run on localhost with the default port of 27017 as shown below.
I used the spring_boot_crud_db named database which I created in the database and collection creation steps.
spring.data.mongodb.host=localhost
spring.data.mongodb.port=27017
spring.data.mongodb.database=spring_boot_crud_db
8. Create A Model Class
Student.java
Now we'll build the Model/Entity that will be mapped to a Document in the MongoDB database.
I've added the fields id, firstname, and lastname to the Student model class.
I developed this Java Model class in the com.onlyxcodes.crudapp.model package.
The @Document annotation specifies the name of the MongoDB collection in which your data will be stored.
In this case, a collection is similar to a table in SQL. In JPA, the document represents the entity.
MongoDB's @Id annotation instructs it to generate a unique Id for each document.
package com.onlyxcodes.crudapp.model;

import org.springframework.data.annotation.Id;
import org.springframework.data.mongodb.core.mapping.Document;

@Document(collection = "student")
public class Student
{
	@Id
	private String id;
	private String firstname;
	private String lastname;

	public Student(String id, String firstname, String lastname) {
		super();
		this.id = id;
		this.firstname = firstname;
		this.lastname = lastname;
	}

	public String getId() {
		return id;
	}

	public void setId(String id) {
		this.id = id;
	}

	public String getFirstname() {
		return firstname;
	}

	public void setFirstname(String firstname) {
		this.firstname = firstname;
	}

	public String getLastname() {
		return lastname;
	}

	public void setLastname(String lastname) {
		this.lastname = lastname;
	}
}
9. Create A Repository Interface
StudentRepository.java
I've created a StudentRepository Interface that extends the MongoRepository Interface.
Inside the com.onlyxcodes.crudapp.repository package, I developed the StudentRepository Interface.
For SQL-based databases, MongoRepository is the same as JPARepository.
MongoRepository comes with CrudRepository, which allows you develop a CRUD application, and contains various default implementations methods like saveAll(), findById(), save(), findAll(), and more.
Syntax:
MongoRepository<T, ID>
T: The sort of domain that the repository is in control of. The name of the Model or Entity class.
ID: The id of the entity that the repository handles is of this type. In most cases, the @Id wrapper class is defined inside the Model or Entity class.
The StudentRepository is the module that creates the database communication for the Student collection. As arguments for MongoRepository, we must provide the Document class name and Data type for the ID value.
package com.onlyxcodes.crudapp.repository;

import org.springframework.data.mongodb.repository.MongoRepository;
import org.springframework.stereotype.Repository;

import com.onlyxcodes.crudapp.model.Student;

@Repository
public interface StudentRepository extends MongoRepository<Student, String> {

}
10. Create A Controller
StudentController.java
Created StudentController class inside com.onlyxcodes.crudapp.controller package.
This class publishes our CRUD operations as a REST API, allowing any user to access and execute CRUD operations on our REST service.
package com.onlyxcodes.crudapp.controller;

import java.util.List;
import java.util.Optional;

import org.springframework.beans.factory.annotation.Autowired;
import org.springframework.http.HttpStatus;
import org.springframework.http.ResponseEntity;
import org.springframework.web.bind.annotation.DeleteMapping;
import org.springframework.web.bind.annotation.GetMapping;
import org.springframework.web.bind.annotation.PathVariable;
import org.springframework.web.bind.annotation.PostMapping;
import org.springframework.web.bind.annotation.PutMapping;
import org.springframework.web.bind.annotation.RequestBody;
import org.springframework.web.bind.annotation.RequestMapping;
import org.springframework.web.bind.annotation.RestController;

import com.onlyxcodes.crudapp.model.Student;
import com.onlyxcodes.crudapp.repository.StudentRepository;

@RestController
@RequestMapping("/api")
public class StudentController
{
	@Autowired
	StudentRepository studentRepository;

	//insert new student records
	@PostMapping("/create")
	public ResponseEntity<?> createStudent(@RequestBody Student student)
	{
		studentRepository.save(student);

		return new ResponseEntity<Student>(student, HttpStatus.OK);
	}

	//get all student records
	@GetMapping("/getall")
	public ResponseEntity<?> getAllStudent()
	{
		List<Student> student = studentRepository.findAll();

		return new ResponseEntity(student, HttpStatus.OK);
	}

	//get single student record by id
	@GetMapping("/{student_id}")
	public ResponseEntity<?> getSingleStudent(@PathVariable("student_id") String id)
	{
		Optional<Student> student = studentRepository.findById(id);

		return new ResponseEntity<>(student.get(),HttpStatus.OK);
	}

	//update existing student record by id
	@PutMapping("/{student_id}")
	public ResponseEntity<?> updateStudentById(@PathVariable("student_id") String id, @RequestBody Student student)
	{
		Optional<Student> studentData = studentRepository.findById(id);

		if (studentData.isPresent())
		{
		    Student std = studentData.get();
		    std.setFirstname(student.getFirstname());
		    std.setLastname(student.getLastname());

		    return new ResponseEntity<>(studentRepository.save(std), HttpStatus.OK);
		 }
		 else
		 {
		   return new ResponseEntity<>(HttpStatus.NOT_FOUND);
		 }

	}

	//delete existing student record by id
	@DeleteMapping("/{student_id}")
	public ResponseEntity<?> deleteStudentById(@PathVariable("student_id") String id)
	{
		studentRepository.deleteById(id);
		return new ResponseEntity<>("Student successfully deleted from  "+id+" number", HttpStatus.OK);
	}

}
Explanation:
@RequestMapping("/api ") indicates that the REST API's URL must begin with "/api" in this controller, allowing us to utilize http://localhost:8080/api as our endpoint.
The @Controller and @ResponseBody annotations are combined in the @RestController annotation. The @Controller annotation denotes a class that has endpoints, whereas the @ResponseBody annotation denotes that a method return value should be linked to the web response body.
Here we use @Autowired for StudentRepository Interface class object injection.
The @PathVariable annotation in Spring connects the URI template variables to the handler method parameters of a controller. The variables of one or more paths contained by braces ({ }) make up a URI template.
Create or Insert Records:
The create operation is a @PostMapping (HTTP POST) request that receives a Student model object as a parameter and stores it to Mongo DB using the MongoRepository pre-defined save() method.
It gives the created example, which will have the distinct id.
//insert new student records
@PostMapping("/create")
public ResponseEntity<?> createStudent(@RequestBody Student student)
{
	studentRepository.save(student);

	return new ResponseEntity<Student>(student, HttpStatus.OK);
}
Read Records:
The read operation is a @GetMapping (HTTP GET) request that uses MongoRepository's findAll() method to return all of the student collection's documents or records.
//get all student records
@GetMapping("/getall")
public ResponseEntity<?> getAllStudent()
{
	List<Student> student = studentRepository.findAll();

	return new ResponseEntity(student, HttpStatus.OK);
}
Get Single Records:
The read single operation uses an @GetMapping (HTTP GET) request and accepts "student_id" as a path variable before calling the findById() method.
It will get records from the Document if an id is present.
//get single student record by id
@GetMapping("/{student_id}")
public ResponseEntity<?> getSingleStudent(@PathVariable("student_id") String id)
{
	Optional<Student> student = studentRepository.findById(id);

	return new ResponseEntity<>(student.get(),HttpStatus.OK);
}
Update Records:
The update operation makes use of a @PutMapping (HTTP PUT) request, accepts "student_id" as a path variable, and first utilizes the findById() method to retrieve specified id-data.
If an id is present, the save() method will update the information in the Document.
If the Document does not have an id value it will return HTTP status not found.
//update existing student record by id
@PutMapping("/{student_id}")
public ResponseEntity<?> updateStudentById(@PathVariable("student_id") String id, @RequestBody Student student)
{
	Optional<Student> studentData = studentRepository.findById(id);

	if (studentData.isPresent())
	{
	    Student std = studentData.get();
	    std.setFirstname(student.getFirstname());
	    std.setLastname(student.getLastname());

	    return new ResponseEntity<>(studentRepository.save(std), HttpStatus.OK);
	}
	else
	{
		return new ResponseEntity<>(HttpStatus.NOT_FOUND);
	}

}
Delete Records:
The delete operation makes use of the @DeleteMapping (HTTP DELETE) request, which takes student_id as a path variable and calls the deleteById() method.
If id is present, the records in the Document will be deleted.
//delete existing student record by id
@DeleteMapping("/{student_id}")
public ResponseEntity<?> deleteStudentById(@PathVariable("student_id") String id)
{
	studentRepository.deleteById(id);
	return new ResponseEntity<>("Student successfully deleted from  "+id+" number", HttpStatus.OK);
}
11. Spring Boot Main Class
SpringBootCrudMongoDbApplication.java
When we create a new spring boot project, the main class is immediately created for us.
This class was developed in my scenario within the package com.onlyxcodes.crudapp. Run the file after you've opened it.
Always remember that the @SpringBootApplication annotation and the static main method are present in the spring boot application class's entry point.
package com.onlyxcodes.crudapp;

import org.springframework.boot.SpringApplication;
import org.springframework.boot.autoconfigure.SpringBootApplication;

@SpringBootApplication
public class SpringBootCrudMongoDbApplication {

	public static void main(String[] args) {
		SpringApplication.run(SpringBootCrudMongoDbApplication.class, args);
	}

}
12. The APIs We Created
Check out the REST APIs we built for CRUD operations below.
| Rest API URL | HTTP Method | Description |
|---|---|---|
| /api/create | POST | Creating new record |
| /api/getall | GET | Display all records |
| /api/{student_id} | GET | Get single record by specific id |
| /api/{student_id} | PUT | Update existing record by specific id |
| /api/{student_id} | DELETE | Delete existing record by specific id |
13. Test API
You must first launch your spring boot project and connect your MongoDB Compass before you can test the API.
Our implementation is now ready to be put to the test. Let's launch our SpringBootCrudMongoDbApplication.java as a java application and attach it to our endpoints.
I used Postman to test our newly created REST API.
1. Create a New Student Record:
First, insert a new student by going to this URL http:/localhost:8080/api/create, selecting the POST method, selecting the raw radio button in the Body tab, setting Content-Type="application/json" in the Headers tab, and pasting the JSON code below.
{
	"firstname" : "hamid",
	"lastname" : "shaikh"
}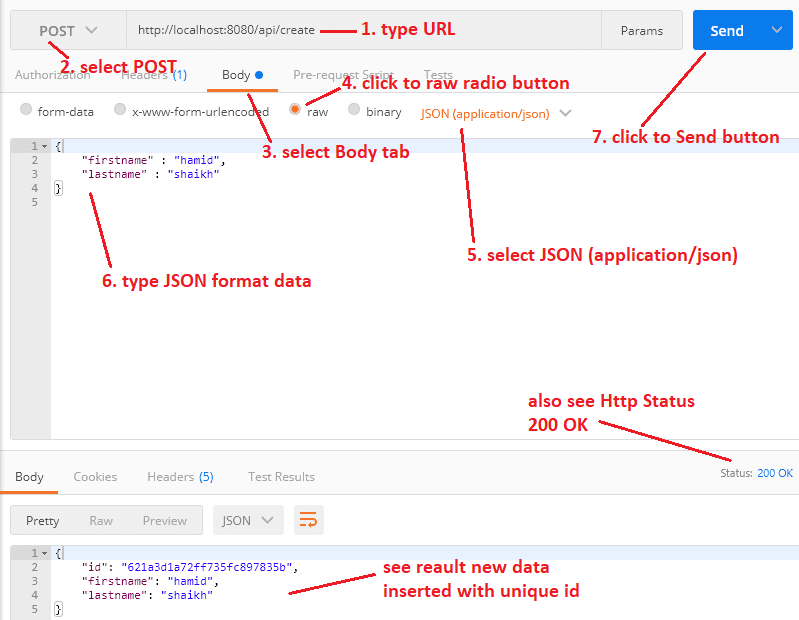
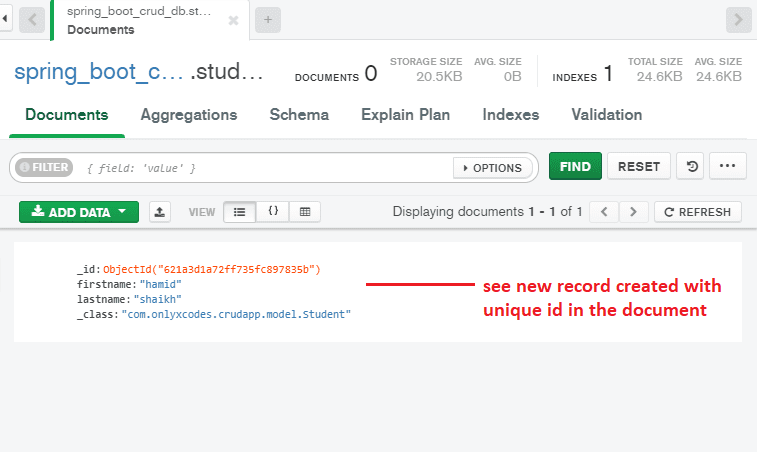
See also the MongoDB Document record created.
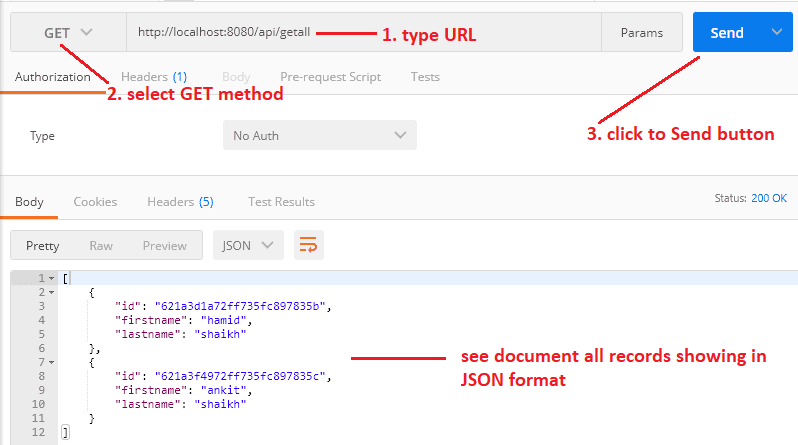
2. Read Student All Record
We retrieve all student records from the Document using the URL http:/localhost:8080/api/getall. Click the Send button after selecting the GET method.
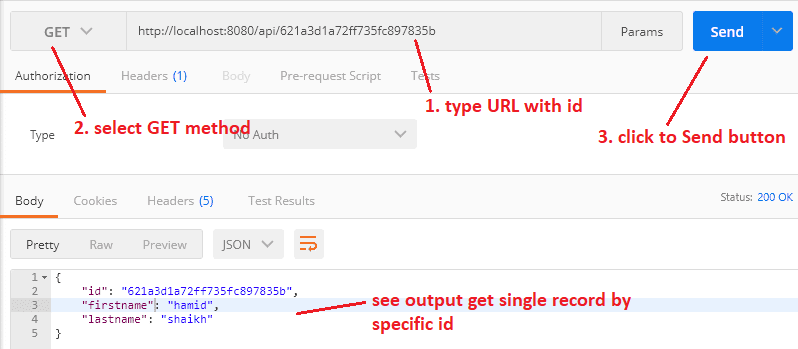
3. Get Single Student Record by Id
You can obtain specific student records by id using this URL http:/localhost:8080/api/621a3d1a72ff735fc897835b. Click the Send button after selecting the GET method.
Note: My document ID is "621a3d1a72ff735fc897835b" at the end of the URL. Since I get record of Id number "621a3d1a72ff735fc897835b". In your scenario, there could be a variety of patterns or numbers.
3. Update Existing Student Record by Id
Using this URL http:/localhost:8080/api/621a3f4972ff735fc897835c, we update the existing student record by selecting the PUT method, selecting the raw radio button in the Body tab, setting Content-Type="application/json" in the Headers tab, and then pasting the following JSON code.
Note: My Document Id is 621a3f4972ff735fc897835c at the end of the URL. Since I updated the 621a3f4972ff735fc897835c Id number's record. Different patterns or numbers may appear in your case.
{
	"firstname" : "faisal",
	"lastname" : "patel"
}
The Id 621a3f4972ff735fc897835c record on the Document has also been updated.

4. Delete Single Student Record by Id
Finally, with this URL http:/localhost:8080/api/621a3f4972ff735fc897835c we delete the student record, select the DELETE method and click the send button.
Note: 621a3f4972ff735fc897835c is the document ID at the end of the URL. Because the Id number 621a3f4972ff735fc897835c was erased.

The record was also removed from the Document.

Wrapping Up.


.png)

No comments:
Post a Comment