I will show how to deploy a spring boot application on tomcat as a war package.
To launch the application, Spring Boot contains an embedded Tomcat Server. An executable JAR that can be launched from the command line without the need for extra server setup contains the program code, libraries, and integrated Tomcat server.
Because it is difficult to manage and maintain applications utilizing the embedded Tomcat server.
We'll go over how to deploy a spring boot application war file, paste it into an external Tomcat server, and execute it on a web browser in this post.
Required Tools
STS ( Spring Tool Suite ).
Java 8 or Above Version.
An External Tomcat Server.
Configuring A New Spring Boot Application
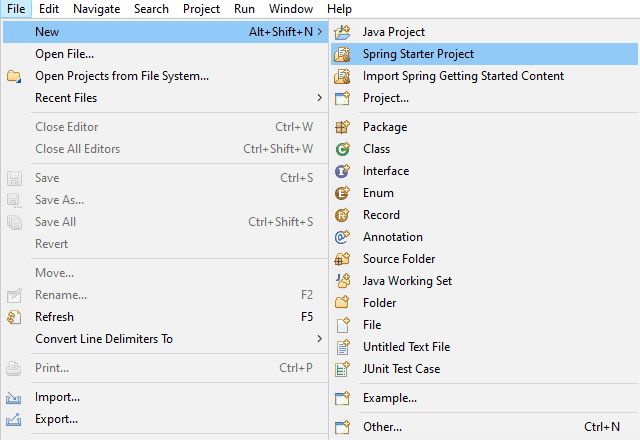
Step 1 – Begin the Spring Tool Suite. Access the Spring Starter Project by selecting File > New. As shown in the following diagram, select Spring Starter Project.
Step 2 – The project is configured in the second stage by entering information such as the name of the artifact, the package, the project description, etc. After filling up, click the next button.
Name – HelloWorld
Group – com.onlyxcodes
Description – How to deploy a Spring Boot Application in tomcat as a war file
Package – com.onlyxcodes.app
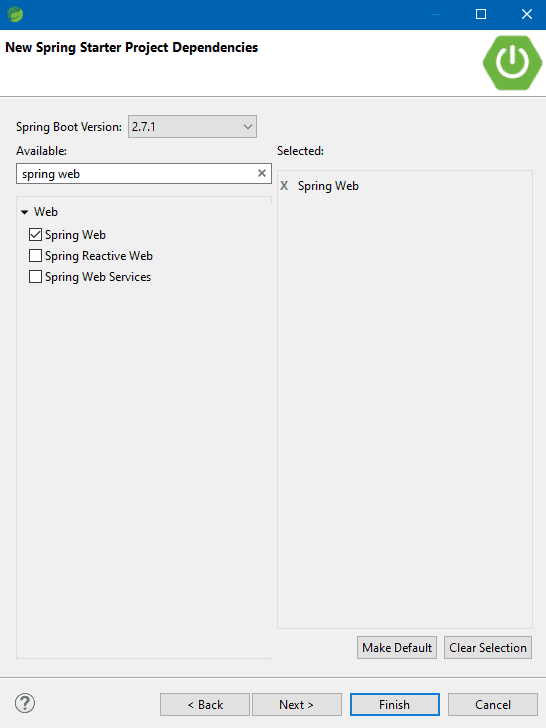
Step 3 – We choose the Spring Web dependency in the third step. After choosing, click the next button below.
Step 4 – Setting up a project is the final stage. Chose to click Finish.
pom.xml
The pom.xml file that appears below is generated by the spring boot after a new application is set up.
In addition to the usual @SpringBootApplication configuration, no other settings are required because Spring Boot handles everything by default.
<?xml version="1.0" encoding="UTF-8"?>
<project xmlns="http://maven.apache.org/POM/4.0.0" xmlns:xsi="http://www.w3.org/2001/XMLSchema-instance"
	xsi:schemaLocation="http://maven.apache.org/POM/4.0.0 https://maven.apache.org/xsd/maven-4.0.0.xsd">
	<modelVersion>4.0.0</modelVersion>
	<parent>
		<groupId>org.springframework.boot</groupId>
		<artifactId>spring-boot-starter-parent</artifactId>
		<version>2.7.1</version>
		<relativePath/> <!-- lookup parent from repository -->
	</parent>
	<groupId>com.onlyxcodes</groupId>
	<artifactId>HelloWorld</artifactId>
	<version>0.0.1-SNAPSHOT</version>
	<name>HelloWorld</name>
	<description>How to deploy Spring Boot application in tomcat as a war file</description>
	<properties>
		<java.version>1.8</java.version>
	</properties>
	<dependencies>
		<dependency>
			<groupId>org.springframework.boot</groupId>
			<artifactId>spring-boot-starter-web</artifactId>
		</dependency>

		<dependency>
			<groupId>org.springframework.boot</groupId>
			<artifactId>spring-boot-starter-test</artifactId>
			<scope>test</scope>
		</dependency>
	</dependencies>

	<build>
		<plugins>
			<plugin>
				<groupId>org.springframework.boot</groupId>
				<artifactId>spring-boot-maven-plugin</artifactId>
			</plugin>
		</plugins>
	</build>

</project>
Create a Controller Class
HelloController.java
The next step is to build the HelloController.java controller class. We include a simple REST API EndPoint to return a basic text message inside of this controller class.
package com.onlyxcodes.app.controller;

import org.springframework.web.bind.annotation.GetMapping;
import org.springframework.web.bind.annotation.RestController;

@RestController
public class HelloController {

	@GetMapping
	public String index() {

		return "welcome to united kingdom";
	}

}
Assembling a Spring Boot WAR
We must first package a WAR app rather than a JAR. In pom.xml, we modify the packaging attribute to do this:
<packaging>war</packaging>Setting Main Class,
To instruct the war file to run from the class that contains the main() method and the @SpringBootApplication annotation, we need to include the following tag inside the properties tag in the pom.xml file.
<start-class>com.onlyxcodes.app.HelloWorldApplication</start-class>After editing the pom.xml file, view it.
<?xml version="1.0" encoding="UTF-8"?>
<project xmlns="http://maven.apache.org/POM/4.0.0" xmlns:xsi="http://www.w3.org/2001/XMLSchema-instance"
	xsi:schemaLocation="http://maven.apache.org/POM/4.0.0 https://maven.apache.org/xsd/maven-4.0.0.xsd">
	<modelVersion>4.0.0</modelVersion>
	<parent>
		<groupId>org.springframework.boot</groupId>
		<artifactId>spring-boot-starter-parent</artifactId>
		<version>2.7.1</version>
		<relativePath/> <!-- lookup parent from repository -->
	</parent>
	<groupId>com.onlyxcodes</groupId>
	<artifactId>HelloWorld</artifactId>
	<version>0.0.1-SNAPSHOT</version>
	<packaging>war</packaging>
	<name>HelloWorld</name>
	<description>How to deploy Spring Boot application in tomcat as a war file</description>
	<properties>
		<java.version>1.8</java.version>
		<start-class>com.onlyxcodes.app.HelloWorldApplication</start-class>
	</properties>
	<dependencies>
		<dependency>
			<groupId>org.springframework.boot</groupId>
			<artifactId>spring-boot-starter-web</artifactId>
		</dependency>

		<dependency>
			<groupId>org.springframework.boot</groupId>
			<artifactId>spring-boot-starter-test</artifactId>
			<scope>test</scope>
		</dependency>
	</dependencies>

	<build>
		<plugins>
			<plugin>
				<groupId>org.springframework.boot</groupId>
				<artifactId>spring-boot-maven-plugin</artifactId>
			</plugin>
		</plugins>
	</build>

</project>
Extends SpringBootServletInitializer Interface In Main Class
In the main class, we extends the SpringBootServletInitializer interface.
However, in order to support the war file, we must include the SpringBootServletInitializer interface when deploying to an external Tomcat server.
Since we extend the class, we must override the method configure (SpringApplicationBuilder application), which is available in the SpringBootServletInitializer class. This is necessary to facilitate the deployment of war files.
The spring boot main class code will appear as displayed below.
HelloWorldApplication.java
package com.onlyxcodes.app;

import org.springframework.boot.SpringApplication;
import org.springframework.boot.autoconfigure.SpringBootApplication;
import org.springframework.boot.builder.SpringApplicationBuilder;
import org.springframework.boot.web.servlet.support.SpringBootServletInitializer;

@SpringBootApplication
public class HelloWorldApplication extends SpringBootServletInitializer {

	@Override
	protected SpringApplicationBuilder configure(SpringApplicationBuilder builder) {

		return builder.sources(HelloWorldApplication.class);
	}

	public static void main(String[] args) {
		SpringApplication.run(HelloWorldApplication.class, args);
	}

}
We must run the mvn clean package in order to create a WAR application that can be deployed by Tomcat.
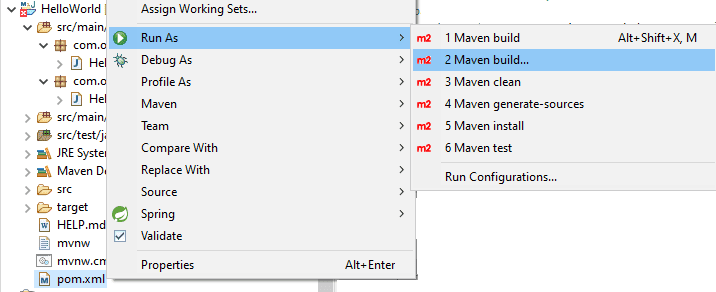
Choose Run As -> Maven build with a right-click on the pom.xml file. View the illustration below.
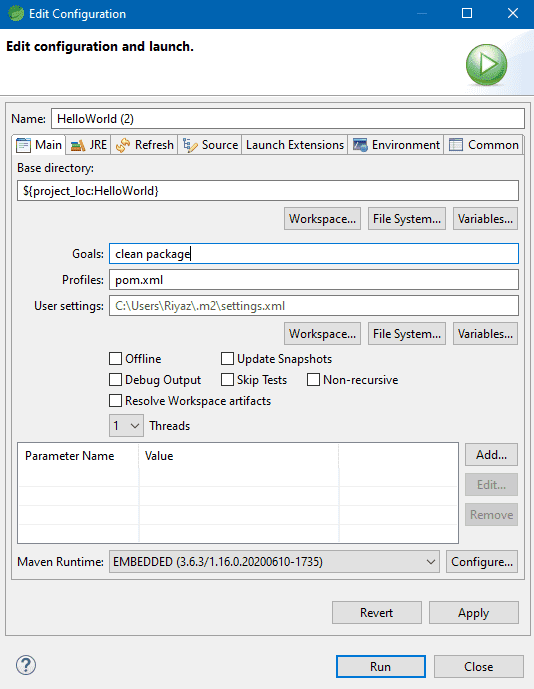
In the Goals option, type the clean package. View the illustration below.
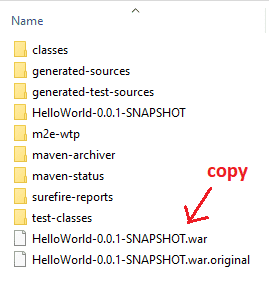
After that, a WAR file called HelloWorld-0.0.1-SNAPSHOT.war is created in the target folder.
Here, the Maven artifactId name determines how the war file is generated. If you use a different artifactId name, the war file will be produced using that name instead.
Deploying Spring Boot war file on External Tomcat
On your computer, you must have Apache Tomcat installed. If not, kindly download and set it up.
Once Tomcat has been installed, copy the HelloWorld-0.0.1-SNAPSHOT.war file from target and put it in the tomcat/webapps/ folder.
Run the External Tomcat Server.
Go to the tomcat/bin folder using the command prompt.
Enter the command startup.sh after typing it. (for the Windows OS)
run catalina.sh (for Unix-based os)
To run your deploy war file and other web app projects, the XAMPP server also offers an external Tomcat server.
Here, I ran the project deploy war file using the XAMPP server's tomcat server.
Look below. Our project's war file is located in the xampp/tomcat/webapps subdirectory.
xampp/
├── tomcat/
	├── webapps/
		├── │  └── HelloWorld-0.0.1-SNAPSHOT.war
Now navigate to http://localhost:8080/HelloWorld-0.0.1-SNAPSHOT to confirm the Rest API is running.
The output displayed in the screenshot below will be visible to you.
Output:
welcome to united kingdom







No comments:
Post a Comment