In this tutorial I will shows you how to display ModelAndView object in HTML using Spring Boot.
The controller sends ModelAndView back to the view layer. The class that contains both the model and view objects enables the controller to return both of them to the view layer as a single return value.
You must return an object of the ModelAndView class rather than just the view name because ModelAndView objects in a method contain both the view name and a model.
In this article, we'll develop a spring boot project and utilize the ModelAndView class object. Using that object, we'll pass an attribute (a model class object) and set a view object (an HTML file), and the ModelAndView object will then return both of those parameters.
Let's started.
Table Content
1. What is Thymeleaf?
2. Make A New Spring Boot Project
3. Import The Project In the STS (Spring Tool Suite)
4. The Dependencies
5. Set Up View Pages
6. Create a Model Class
7. Create a Controller Class
8. View Pages
9. Run Application
10. Output
What is Thymeleaf?
Thymeleaf is a Java-based server-side templating technology both for standalone and web applications.
HTML, XML, JavaScript, CSS, and even plain text can all be processed by it. It offers total Spring Framework integration.
It renders dynamic content on UIs and has greater power than JSP. Additionally, it is frequently used while developing web applications with Spring MVC.
It has direct access to Java objects and Spring beans, which it may connect to a user interface.
Why do we use Thymeleaf?
JSP and HTML are somewhat comparable. However, unlike Thymeleaf, it is not entirely compatible with HTML. A Thymeleaf template file can be opened and displayed normally in the browser, but a JSP file cannot.
As with Spring EL, Thymeleaf facilitates variable expressions (${...}), which are executed on model properties. Asterisk expressions (*{...}), which are used for form backing beans, hash expressions (#{...}), which are used for integration, and link expressions (@{...}), which rewrite URLs, are also assisted.
Thymeleaf functions nicely for Rich HTML communications, just like JSP.
Let's get started on our project.
Make A New Spring Boot Project
Create a new spring boot project by visiting the Spring Initializr website.
The online UI provided by Spring Initializr is simple and quick to use when creating, configuring, and generating Spring-based applications.
With the help of this tool, developers can quickly build an initial project structure without thinking about dependencies or the project's structure.
Project - Maven Project
Language - Java
Spring Boot - 2.7.2 Version
Above three options by default selected by spring initialezr.
Let's fill up every field in the Project Metadata.
Group - om.onlyxcodes
Artifact - ModelAndViewObjectExample. This is the project name.
Description - A brief project description, such as How to display ModelAndObject in HTML, is typed here.
Package Name - com.onlyxcodes.app. Within this package, we create more packages and classes, and we run our application.
Packaging - We choose Jar here. It will contain the required Jar files.
Next click on the right sidebar ADD DEPENDENCIES button.
Search for Spring Web and Thymeleaf dependency after opening a custom window, then add them.
Spring Web dependency(spring-boot-starter-web) - Includes the embedded Tomcat servlet container and all the dependencies and auto-configuration we need to create a web application in Spring Boot.
Thymeleaf Dependency(spring-boot-starter-thymeleaf) - Enables the compilation of Thymeleaf files and uses Java objects to generate HTML templates or files.
The project zip file will then be downloaded automatically when you click the GENERATE button.
Import The Project In the STS (Spring Tool Suite)
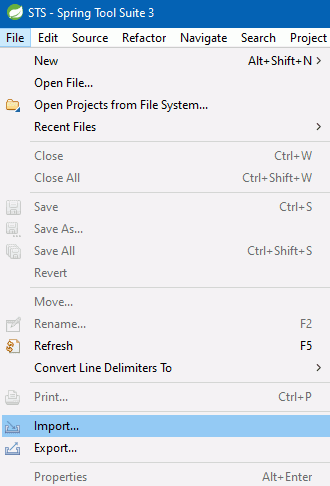
Open the Spring Too Suite Tool. Go to File and select Import as seen in the following diagram.
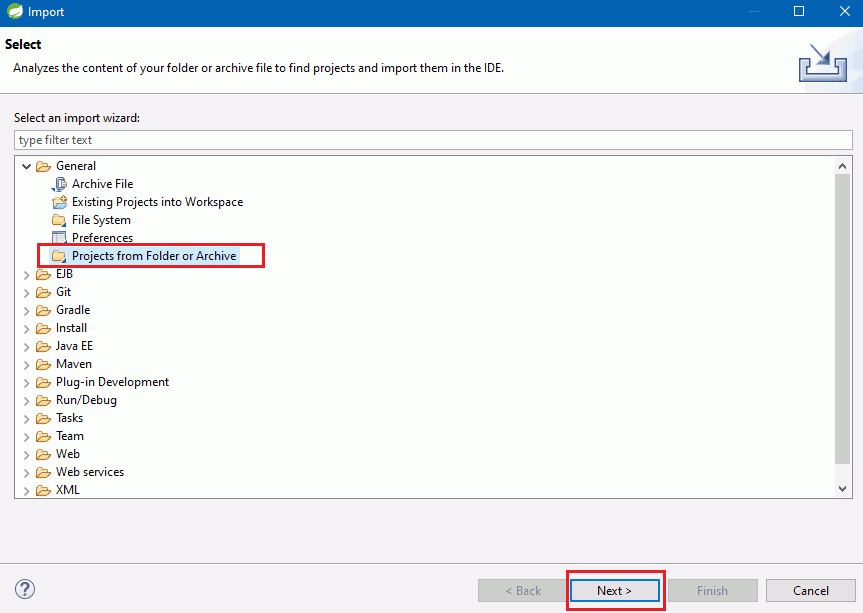
To view the Open custom window, select Projects from Folder or Archive.
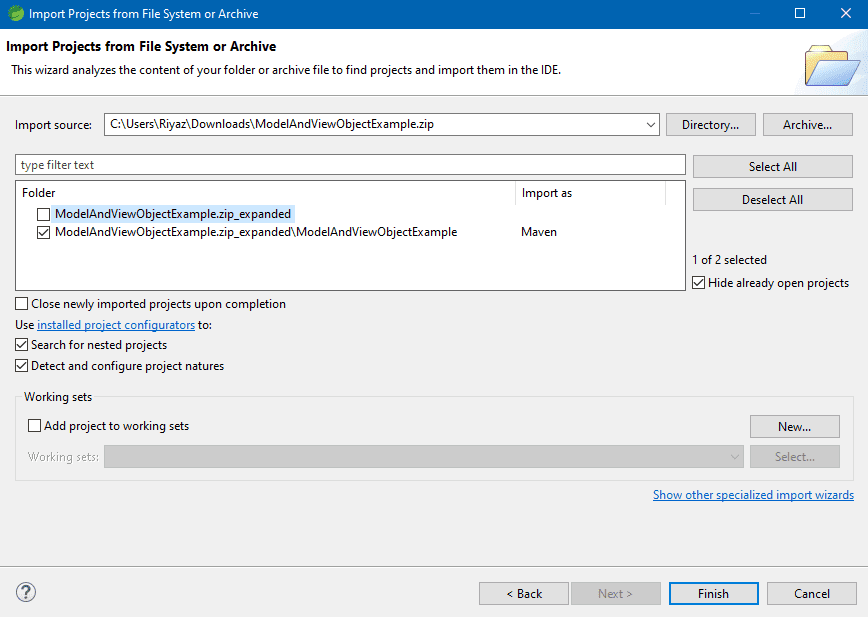
Click the Archive button in the right-hand sidebar as soon as the custom window reappears.
From the download folder's directory, choose the zip file for the ModelAndViewObjectExample project.
View the project's imported zip file. The ModelAndViewObjectExample.zip expanded checkbox is not required, therefore please leave it unchecked. Select "Finish" from the menu.
View the entire project directory structure, which includes the additional packages and classes that we'll be creating for it.
The Dependencies
pom.xml
Spring Boot can automatically configure the project settings and all dependencies because we used Maven.
<?xml version="1.0" encoding="UTF-8"?>
<project xmlns="http://maven.apache.org/POM/4.0.0" xmlns:xsi="http://www.w3.org/2001/XMLSchema-instance"
	xsi:schemaLocation="http://maven.apache.org/POM/4.0.0 https://maven.apache.org/xsd/maven-4.0.0.xsd">
	<modelVersion>4.0.0</modelVersion>
	<parent>
		<groupId>org.springframework.boot</groupId>
		<artifactId>spring-boot-starter-parent</artifactId>
		<version>2.7.2</version>
		<relativePath/> <!-- lookup parent from repository -->
	</parent>
	<groupId>com.onlyxcodes</groupId>
	<artifactId>ModelAndViewObjectExample</artifactId>
	<version>0.0.1-SNAPSHOT</version>
	<name>ModelAndViewObjectExample</name>
	<description>How to Display ModelAndView Object in HTML</description>
	<properties>
		<java.version>1.8</java.version>
	</properties>
	<dependencies>
		<dependency>
			<groupId>org.springframework.boot</groupId>
			<artifactId>spring-boot-starter-thymeleaf</artifactId>
		</dependency>
		<dependency>
			<groupId>org.springframework.boot</groupId>
			<artifactId>spring-boot-starter-web</artifactId>
		</dependency>

		<dependency>
			<groupId>org.springframework.boot</groupId>
			<artifactId>spring-boot-starter-test</artifactId>
			<scope>test</scope>
		</dependency>
	</dependencies>

	<build>
		<plugins>
			<plugin>
				<groupId>org.springframework.boot</groupId>
				<artifactId>spring-boot-maven-plugin</artifactId>
			</plugin>
		</plugins>
	</build>

</project>
Include the following dependencies in your build.gradle file for a Gradle project:
implementation 'org.springframework.boot:spring-boot-starter-thymeleaf'
implementation 'org.springframework.boot:spring-boot-starter-web'
Set Up View Pages
application.properties
The default location for Spring Boot's templates is the src/main/resources/templates folder.
Default Value is classpath:/templates/.
With the spring.thymeleaf.prefix property in application.properties, we can provide the default location:
spring.thymeleaf.suffix - That will be the value that is added to the URL when the view name is created. The default setting is .html.
#view pages property settings
spring.thymeleaf.prefix=classpath:/templates/
spring.thymeleaf.suffix=.html
Create A Model Class
Person.java
Create the Person model class. In this class, we defined two variables that store the names of the attributes that make up the form field names in the index.html file.
Then, for both parameters, setter and getter methods are used.
Note:- The name attribute of the form fields and the first two variables must match.
The form fields must contain the name and country variables. If not, an error message will be displayed.
<input type="text" name="name">
<input type="text" name="country">
package com.onlyxcodes.app.model;

public class Person {

	private String name;
	private String country;

	public String getName() {
		return name;
	}
	public void setName(String name) {
		this.name = name;
	}
	public String getCountry() {
		return country;
	}
	public void setCountry(String country) {
		this.country = country;
	}

}
Create A Controller Class
FormController.java
Let's create the FormController.java Spring Boot controller class, which manages all HTTP requests and renders the response to the view.
package com.onlyxcodes.app.controller;

import org.springframework.stereotype.Controller;
import org.springframework.web.bind.annotation.GetMapping;
import org.springframework.web.bind.annotation.ModelAttribute;
import org.springframework.web.bind.annotation.PostMapping;
import org.springframework.web.bind.annotation.RequestMapping;
import org.springframework.web.bind.annotation.RequestMethod;
import org.springframework.web.servlet.ModelAndView;

import com.onlyxcodes.app.model.Person;

@Controller
public class FormController {

	@GetMapping("/")
	public String viewIndexPage()
	{
		return "index";
	}

	@PostMapping("/process_data")
	public ModelAndView submitData(@ModelAttribute Person person)
	{
		ModelAndView modelandview = new ModelAndView();
		modelandview.addObject("data", person);
		modelandview.setViewName("welcome");
		return modelandview;
	}
}
The annotated class is a web controller, as indicated by the @Controller annotation.
To map HTTP GET requests to a specified controller method, we use the @GetMapping annotation. The "/" endpoint is mapped into the viewIndexPage() method in the above example.
The index.html file is displayed by viewIndexPage(), and this file has a form with two fields.
For mapping HTTP POST requests, use the @PostMapping annotation.
The form action attribute (th:action="@/process data") specifies the endpoint or URL "/process data", which is mapped by the @PostMapping annotation.
The processing necessary for the submitted form is carried out by the annotated method submitData().
The form fields are connected to the person object through the @ModelAttribute annotation.
An object called ModelAndView is used to store both the model and the view. DispatcherServlet resolves the view by utilizing View Resolvers and View after the handler returns the ModelAndView object.
A model is a map that can be used to add many objects, and a view is an object that contains a view name in the form of a String.
The ModelAndView technique is the most common method for a controller to return both model and view data. You can mix the String return value and the Model parameter.
We create an object called modelandview, which stands for ModelAndView.
There is another method of adding attributes that is supported by the ModelAndView. The addObject() method can be used to add attributes.
We add the "data" attribute and the person object of the Person model class using the addObject() method.
To set our welcome.html page, we used the setViewName() method.
We then provide the modelandview object return.
View Pages
index.html
This is the file named index.html. This file is displayed by the FormController method viewIndexPage().
A form with two fields for user input is present in this file.
In the <html> tag must include xmlns:th="http://www.thymeleaf.org" because that enable thymeleaf template engine.
The th:action="@{url}" link allows us to handle form input. To specify the form action URL, we use th:action.
The form action URL is indicated by the code below, /process_data. The submitData() controller method retrieves this URL, which is submitted using the th:action via an HTTP POST request.
<!DOCTYPE html>
<html xmlns:th="http://www.thymeleaf.org">
<head>
<meta charset="ISO-8859-1">
<title>Index</title>
</head>
<body>
	<form th:action="@{/process_data}" method="post">
		<table border="1">
			<tr>
				<td>Enter Person Name</td>
				<td><input type="text" name="name"></td>
			</tr>
			<tr>
				<td>Enter Country Name</td>
				<td><input type="text" name="country"></td>
			</tr>
			<tr>
				<td><input type="submit" value="Submit"></td>
			</tr>
		</table>
	</form>
</body>
</html>
welcome.html
The welcome file is here. The values entered on the form are shown in this file.
We also added the xmlns:th="http://www.thymeleaf.org" attribute to the <html> element to activate the thymeleaf engine.
Using thymeleaf th:text="${}" syntax we get object. Here the "data" is the object that comes from the controller method.
Using the "data" object, we display the values entered into the form using the thymeleaf th:text="${}" syntax.
th:text="${data.name}" - This displays person name values.
th:text="${data.country} - This displays country name values.
<!DOCTYPE html>
<html xmlns:th="http://www.thymeleaf.org">
<head>
<meta charset="ISO-8859-1">
<title>Welcome</title>
</head>
<body>

	<h1 th:text="${data.name}"></h1>

	<h1 th:text="${data.country}"></h1>

</body>
</html>
Run Application
This step involves running the example using the embedded Tomcat server provided by spring boot.
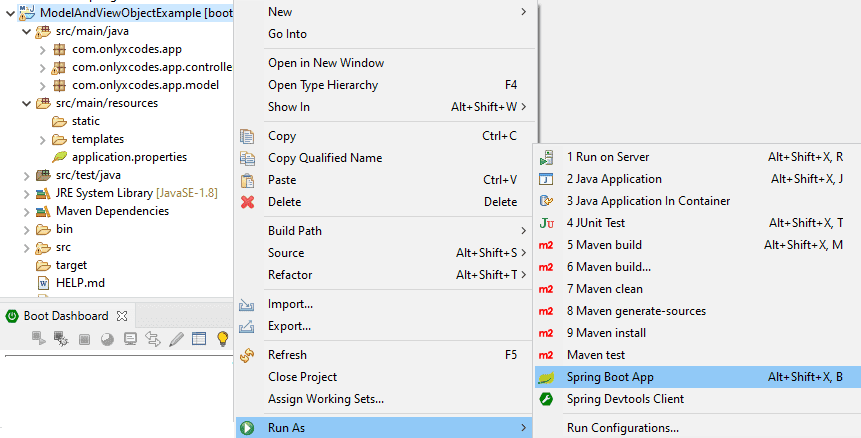
Right-click on the project and select Run as -> Spring Boot App
The example is running in the spring boot embedded tomcat server.
Output
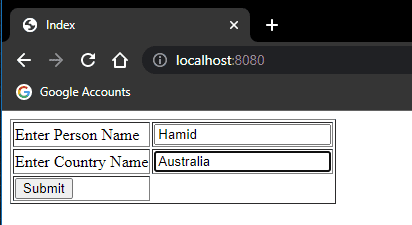
When you enter localhost:8080 in your web browser after running this example, a form with two fields will appear.
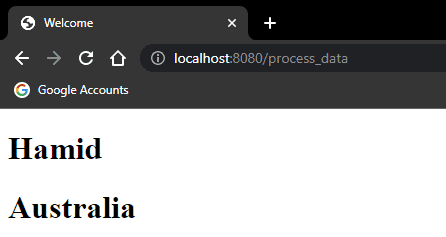
Enter data, click the submit button, and the welcome file will display the results of your submission.
Hamid
Australia
Thank You.









No comments:
Post a Comment