
With a little configuration, Spring Boot makes it simple to build standalone, production-quality Spring-based apps.
This post will show you how to use Spring Boot, H2 Database, and Spring Data JPA to develop a Restful API CRUD app.
Using Restful APIs, users can request to create, read, update, and delete a product in this example's simple Product CRUD operations.
Let's start by taking a look at the H2 database's overview.

Table Content
1. What is H2 Database?
2. Make New Spring Boot Project
3. Maven Dependency
4. Assembly application.properties file
5. Make Entity Class
6. Make The Repository Interface
7. Make Product Service
8. Create Controller Class
9. Spring Boot Main Class
10. The APIs
11. Test Application
1. What is H2 Database?
H2 is an in-memory, integrated database. It is a Java-based relational database management system. Unit testing typically uses it. Instead of persisting data on the disk, it stores data in memory.
Simply install the h2 database maven dependency to use this database in a spring boot application. When your app starts up, this database is created, and it will be deleted when it is closed.
2. Make New Spring Boot Project
Open STS (Spring Tool Suite) and choose File->New->Spring Starter Project from the top menu option.

The project artifact name, brief description, project type (maven), project packaging (jar), and package name are entered in this phase as shown below.

We add the necessary dependencies to our project in the third step. Spring Data JPA, Spring Web, and H2 Database. We then choose them and press the next button below that.

Setting up a project is the final stage. Pick to click Finish.

The full directory structure for the project, which we will create using classes, interfaces, and packages, is shown below.

3. Maven Dependency
Spring Boot automatically configures all of the maven dependencies in the pom.xml file because we use the maven project.
Note:- Please be aware that we may have updated versions of these dependencies by the time you read this article, and it is always advised to use the most recent stable version.
pom.xml
<?xml version="1.0" encoding="UTF-8"?>
<project xmlns="http://maven.apache.org/POM/4.0.0" xmlns:xsi="http://www.w3.org/2001/XMLSchema-instance"
	xsi:schemaLocation="http://maven.apache.org/POM/4.0.0 https://maven.apache.org/xsd/maven-4.0.0.xsd">
	<modelVersion>4.0.0</modelVersion>
	<parent>
		<groupId>org.springframework.boot</groupId>
		<artifactId>spring-boot-starter-parent</artifactId>
		<version>2.7.3</version>
		<relativePath/> <!-- lookup parent from repository -->
	</parent>
	<groupId>com.onlyxcodes</groupId>
	<artifactId>SpringBootCrudH2Databse</artifactId>
	<version>0.0.1-SNAPSHOT</version>
	<name>SpringBootCrudH2Databse</name>
	<description>h2 in-memory database spring example</description>
	<properties>
		<java.version>1.8</java.version>
	</properties>
	<dependencies>
		<dependency>
			<groupId>org.springframework.boot</groupId>
			<artifactId>spring-boot-starter-data-jpa</artifactId>
		</dependency>
		<dependency>
			<groupId>org.springframework.boot</groupId>
			<artifactId>spring-boot-starter-web</artifactId>
		</dependency>

		<dependency>
			<groupId>com.h2database</groupId>
			<artifactId>h2</artifactId>
			<scope>runtime</scope>
		</dependency>
		<dependency>
			<groupId>org.springframework.boot</groupId>
			<artifactId>spring-boot-starter-test</artifactId>
			<scope>test</scope>
		</dependency>
	</dependencies>

	<build>
		<plugins>
			<plugin>
				<groupId>org.springframework.boot</groupId>
				<artifactId>spring-boot-maven-plugin</artifactId>
			</plugin>
		</plugins>
	</build>

</project>
spring-boot-starter-web: This is used to develop web layers, including REST APIs, and Spring MVC applications. Tomcat is used as the standard embedded container.
spring-boot-starter-data-jpa: This contains JPA API, JPA Implementation (by default, hibernate), JDBC, spring data, and other necessary libraries.
h2: We are using the h2 database even though we can easily add any database using the data source parameters in the application.properties file because we want to avoid adding any further complexity.
spring-boot-starter-test: It utilizes tools like JUnit and Mockito to test Spring Boot applications.
4. Assembly application.properties file
The application connects to an in-memory database by default with the login sa and an empty password according to Spring Boot configuration.
The application can be altered by including the following properties, too.
application.properties
spring.h2.console.enabled=true
spring.datasource.url=jdbc:h2:mem:demodb
spring.datasource.driver-class-name=org.h2.Driver
spring.datasource.username=sa
spring.datasource.password=admin
spring.jpa.database-platform=org.hibernate.dialect.H2Dialect
spring.jpa.hibernate.ddl-auto=update
Explanation:
spring.h2.console.enabled=true: The H2 database includes a built-in GUI console for viewing database contents and executing SQL queries. The H2 console is not turned on by default in Spring.
The following property must be added to enable it.
spring.h2.console.enabled=truespring.datasource.url=jdbc:h2:mem:demodb: Mem is the name of an in-memory database in this property, and "testdb" is the name of the default schema that H2 provides.
In my example, I gave the database the name "demodb."
When I will use localhost:8080/h2-console to view the H2 console. When working with the "demodb" database, I will then add this URL (jdbc:h2:mem:demodb) to the JDBC URL.
spring.datasource.url=jdbc:h2:mem:demodbspring.datasource.username=sa: This is the username that h2-database uses by default.
spring.datasource.username=saspring.datasource.password=admin: H2-console offers an empty default password.
Here, I alter this value and use the password "admin."
spring.datasource.password=adminspring.jpa.database-platform=org.hibernate.dialect.H2Dialect: Hibernate is used by Spring Boot to provide Spring Data JPA, thus we set spring.jpa.database-platform=org.hibernate.dialect.H2Dialect.
A mapping between a java language data type and a database datatype is contained in the class and road dialect, which connects Java JDBC types and SQL types.
Hibernate can generate SQL that is crafted for a certain relational database according to dialect. Based on the Dialect class, Hibernate produces queries for the particular database.
spring.jpa.database-platform=org.hibernate.dialect.H2Dialectspring.jpa.hibernate.ddl-auto=update: This property's update setting ensures that any modifications we make are reflected in the schema.
As an illustration, if a new field is introduced to an entity, the table will simply be changed to fit the new column without erasing the data.
spring.jpa.hibernate.ddl-auto=update5. Make Entity Class
We will make an entity class in this phase that will connect to the database table. The Java POJO (Plain Old Java Objects) class is all that it is.
When we execute this example, this class will automatically create a table in the h2 in-memory database.
The name of the table's column will be "tbl_product".
Product.java
package com.onlyxcodes.app.model;

import javax.persistence.Entity;
import javax.persistence.GeneratedValue;
import javax.persistence.GenerationType;
import javax.persistence.Id;
import javax.persistence.Table;

@Entity
@Table(name = "tbl_product")
public class Product {

	@Id
	@GeneratedValue(strategy = GenerationType.IDENTITY)
	private int id;
	private String name;
	private double price;

	public Product() {
		super();
	}

	public Product(int id, String name, double price) {
		super();
		this.id = id;
		this.name = name;
		this.price = price;
	}

	public int getId() {
		return id;
	}

	public void setId(int id) {
		this.id = id;
	}

	public String getName() {
		return name;
	}

	public void setName(String name) {
		this.name = name;
	}

	public double getPrice() {
		return price;
	}

	public void setPrice(double price) {
		this.price = price;
	}
}
The class's @Entity annotation identifies it as a persistent Java class.
The table name that we define is created using the @Table annotation. Here, "tbl_product" is defined.
Hibernate will build the "tbl_product" name table in our "demodb" database when we execute this application.
The primary key is indicated by the annotation @Id in the annotated field.
The primary key generation strategy is described using the @GeneratedValue annotation.
In this case, IDENTITY is used to generate an auto-increment ID whenever a new record is added to the table.
6. Make The Repository Interface
Make a ProductRepository interface that extends the JpaRepository interface and includes built-in CRUD features.
A JPA (Java Persistence API) a specific extension of Repository is JpaRepository. It includes the whole API for the PagingAndSortingRepository and CrudRepository. As a result, it has an API for both basic CRUD operations and an API for sorting and pagination.
In our example, the model is Product, and the ID type is Integer, and these two parameters are passed to the JpaRespository interface.
Now, we don't need to provide implementation in order to use the JpaRepository methods save(), findById(), and findAll().
This interface is identified as a Spring Data JPA repository by the @Repository annotation.
ProductRepository.java
package com.onlyxcodes.app.repository;

import org.springframework.data.jpa.repository.JpaRepository;
import org.springframework.stereotype.Repository;

import com.onlyxcodes.app.model.Product;

@Repository
public interface ProductRepository extends JpaRepository<Product, Integer>{

}
7. Make Product Service
A service is an interface that enables the creation of many implementations of the same services.
Make an interface called ProductService. The interface specifies the fundamental CRUD operations that our ProductServiceImpl class will use.
ProductService.java
package com.onlyxcodes.app.service;

import java.util.List;

import com.onlyxcodes.app.model.Product;

public interface ProductService {

	Product create(Product product);

	Product update(Product product, int productId);

	void delete(int productId);

	Product getById(int productId);

	List<Product> getAll();

}
Now,
Implements Product Service Interface:
Make a class called ProductServiceImp that implements the ProductService interface that we previously built.
Spring is aware of this class as a service because of the @service annotation.
To utilize the many methods that JpaRepository offers, we create and initialize the ProductRepository in the constructor of this class.
ProductServiceImpl.java
package com.onlyxcodes.app.service;

import java.util.List;

import org.springframework.beans.factory.annotation.Autowired;
import org.springframework.stereotype.Service;

import com.onlyxcodes.app.model.Product;
import com.onlyxcodes.app.repository.ProductRepository;

@Service
public class ProductServiceImpl implements ProductService{

	private ProductRepository productRepository;

	@Autowired
	public ProductServiceImpl(ProductRepository productRepository) {
		super();
		this.productRepository = productRepository;
	}

	@Override
	public Product create(Product product) {

		return this.productRepository.save(product);
	}

	@Override
	public Product update(Product product, int productId) {

		Product p = this.productRepository.findById(productId).orElseThrow(() -> new RuntimeException("product not found"));
		p.setName(product.getName());
		p.setPrice(product.getPrice());

		Product modify = this.productRepository.save(p);

		return modify;
	}

	@Override
	public void delete(int productId) {

		Product p = this.productRepository.findById(productId).orElseThrow(() -> new RuntimeException("product not found"));
		this.productRepository.delete(p);
	}

	@Override
	public Product getById(int productId) {

		Product p = this.productRepository.findById(productId).orElseThrow(() -> new RuntimeException("product not found"));
		return p;
	}

	@Override
	public List<Product> getAll() {

		List<Product> listall = this.productRepository.findAll();
		return listall;

	}

}
Explanation:
Save Product:
Using the productRepository object, we execute the save() method to create products.
The save() method for saving entities is available in JpaRepository.
@Override
public Product create(Product product) {

	return this.productRepository.save(product);
}
Update Product:
To obtain a product id, we use the findById() method on a productRepository object.
We obtain properties (name, price) from the Product object and set them into the new object (p).
We passed the new object (p), which set the new property values, to the save() method. And we assign this statement to the Product's modified object before returning it.
The save() method will update a product if a product id is found; otherwise, the orElseThrow() method will raise a RuntimeException.
By using the orElseThrow() method, we may offer a unique Exception instance. If it is present, this method will only return a value. Otherwise, a supplier-created exception will be thrown.
@Override
public Product update(Product product, int productId) {

	Product p = this.productRepository.findById(productId).orElseThrow(() -> new RuntimeException("product not found"));
	p.setName(product.getName());
	p.setPrice(product.getPrice());

	Product modify = this.productRepository.save(p);

	return modify;
}
Delete Product:
To get a product id, we use the findById() method on a productRepository object.
A product will be deleted using the delete() method if a product id is discovered.
RuntimeException is thrown by the orElseThrow() method if an id cannot be found, displaying the message "Product not found" in its place.
@Override
public void delete(int productId) {

	Product p = this.productRepository.findById(productId).orElseThrow(() -> new RuntimeException("product not found"));
	this.productRepository.delete(p);
}
Get Single Product:
Here, we once more retrieved a single product id value using the findById() method.
Again, in this case, we utilized the orElseThrow() method, which would throw a RuntimeException if the product id is not available.
@Override
public Product getById(int productId) {

	Product p = this.productRepository.findById(productId).orElseThrow(() -> new RuntimeException("product not found"));
	return p;
}
Get All Product:
Here, we list all products using the findAll() method via the productRepository object.
@Override
public List<Product> getAll() {

	List<Product> listall = this.productRepository.findAll();
	return listall;

}
8. Create Controller Class
We develop a class of controllers that manages the creation, update, and deletion of product requests.
This class is identified as a controller by the annotation @RestController and is capable of handling incoming HTTP requests.
The base path to the resource endpoints in the controller is set to /api using the annotation @RequestMapping("/api").
We utilize @Autowired for ProductService class object injection in our controller class. We will write code for the handler methods once each CRUD operation has been implemented.
ProductController.java
package com.onlyxcodes.app.controller;

import java.util.List;
import java.util.Map;

import org.springframework.beans.factory.annotation.Autowired;
import org.springframework.http.HttpStatus;
import org.springframework.http.ResponseEntity;
import org.springframework.web.bind.annotation.DeleteMapping;
import org.springframework.web.bind.annotation.GetMapping;
import org.springframework.web.bind.annotation.PathVariable;
import org.springframework.web.bind.annotation.PostMapping;
import org.springframework.web.bind.annotation.PutMapping;
import org.springframework.web.bind.annotation.RequestBody;
import org.springframework.web.bind.annotation.RequestMapping;
import org.springframework.web.bind.annotation.RestController;

import com.onlyxcodes.app.model.Product;
import com.onlyxcodes.app.service.ProductService;

@RestController
@RequestMapping("/api")
public class ProductController {

	@Autowired
	private ProductService productService;

	//create product
	@PostMapping
	public ResponseEntity<Product> createProduct(@RequestBody Product product)
	{
		Product p = this.productService.create(product);
		return new ResponseEntity<>(p, HttpStatus.CREATED);
	}

	//update product
	@PutMapping("/{productId}")
	public ResponseEntity<Product> updateProduct(@RequestBody Product product, @PathVariable int productId)
	{
		Product p = this.productService.update(product,productId);
		return new ResponseEntity<>(p, HttpStatus.OK);
	}

	//delete product
	@DeleteMapping("/{productId}")
	public ResponseEntity<Map<String, String>> deleteProduct(@PathVariable int productId)
	{
		this.productService.delete(productId);
		Map<String, String> message = Map.of("message", "product deleted successfully");
		return new ResponseEntity<>(message, HttpStatus.OK);
	}

	//get single product
	@GetMapping("/{productId}")
	public ResponseEntity<Product> getSingleProduct(@PathVariable int productId)
	{
		Product product = this.productService.getById(productId);

		return new ResponseEntity<>(product, HttpStatus.OK);
	}

	//get all product
	@GetMapping
	public ResponseEntity<List<Product>> getAllProduct()
	{
		List<Product> all = this.productService.getAll();

		return new ResponseEntity<>(all, HttpStatus.OK);
	}

}
Explanation:
The annotation @GetMapping denotes that a GET request is processed by the function.
An annotation called @PostMapping specifies that a function handles a POST request.
The annotation @PutMapping shows that a function handles a PUT request.
The annotation @DeleteMapping indicates that a function handles a DELETE request.
The whole HTTP response—headers, body, and status code—is represented by the ResponseEntity object. We can use it to fully configure the HTTP response as a response.
The handler methods of Spring controllers are relevant to the @RequestBody annotation. This annotation instructs Spring to convert a request body into an object by deserializing it. As a parameter to the handler method, this object is supplied.
According to operations, ResponseEntity outputs the HTTP response status code.
The createProduct() and updateProduct() methods in the above controller class both have the @RequestBody annotation declared on them.
The @RequestBody annotation instructs Spring to deserialize an incoming request body and return it as an object in the Product class.
The request URI mapping can handle template variables and put them as method parameters using the @PathVariable annotation.
We utilize the @PathVariable annotation in the updateProduct(), deleteProduct(), and getSingleProduct() methods to extract the templated component of the URI, which is represented by the variable "productId."
With the retrieved id value, the PUT request to /api/{productId} will call updateProduct():
http://localhost:8080/api/10
id: 10
With the retrieved id value, the DELETE request to /api/{productId} will call deleteProduct():
http://localhost:8080/api/11
id: 11
With the retrieved id value, the GET request to /api/{productId} will call getSingleProduct():
http://localhost:8080/api/13
id: 13
We use the Map.of() method, which returns a value of a key, within the deleteProduct() method.
Here, the value is "product deleted successfully," and the key is "message."
The "message" key is what we insert into the ResponseEntity<>, which, if the product is deleted, returns both a status code and a value (product deleted successfully).
9. Spring Boot Main Class
This class executes our Spring Boot application and contains the main method.
SpringBootCrudH2DatabseApplication.java
package com.onlyxcodes.app;

import org.springframework.boot.SpringApplication;
import org.springframework.boot.autoconfigure.SpringBootApplication;

@SpringBootApplication
public class SpringBootCrudH2DatabseApplication {

	public static void main(String[] args) {
		SpringApplication.run(SpringBootCrudH2DatabseApplication.class, args);
	}

}
10. The APIs
Following are the REST endpoints:
| Operation | HTTP Method | Rest APIs | Description |
|---|---|---|---|
| Create | POST | /api | Create Product to Database |
| Update | PUT | /api/{productId} | Update Existing Product Records |
| Delete | DELETE | /api/{productId} | Delete Existing Product Records |
| Get | GET | /api/{productId} | Get Single Product Records from Database |
| Get | GET | /api | Fetch All Product Records from Database |
11. Test Application
You must run this application first before testing the example.
As indicated in the figure below, right-click the project, choose Run As, and then choose Spring Boot App.

After executing the application how to open the h2 database in a browser.
We open the h2 database in a browser by going to this URL: http://localhost:8080/h2-console/.
To access the database, enter the following three properties in the h2 database login console.
JDBC URL: jdbc:h2:mem:demodb
User Name: sa
Password: admin

Look for the properly formed "tbl_product" table in the left sidebar after logging into the h2 database.

Now we test this application.
To test and CRUD example the APIs, I used the Postman tool. Additionally, this tool is accessible through the Google Chrome browser extension.
1. Create Product:
The first step is to add a new product to the following URL: http://localhost:8080/api, choose the POST method, choose the raw radio button in the Body tab, set Content-Type="application/json" in the Headers tab, and then paste the JSON code below.
{
	"name" : "iphone",
	"price" : "1000"
}
Click on the run tab after selecting the "tbl_product" to view the record that was added to the h2 database table.

2. Read All Product Records
We read all product records using this URL: http://localhost:8080/api. Click the Send button after selecting the GET method.

3. Read Single Product Record
We read the id 1 product record using this URL http://localhost:8080/api/1. Click the Send button after selecting the GET method.

4. Update Product Record
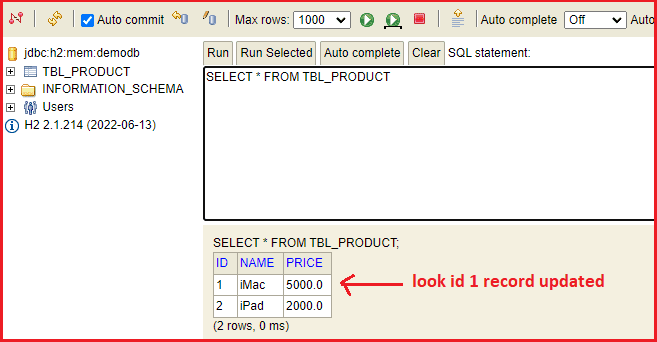
Using the URL http://localhost:8080/api/1, we update the current product record by choosing the PUT method, choosing the raw radio button in the Body tab, set Content-Type="application/json" in the Headers tab, and pasting the JSON code below.
Note: Your table ID is at URL end 1. because I updated the records for 1 ID number.
{
	"name" : "iMac",
	"price" : "5000"
}
See also the h2 database table's Id 1 record update.
5. Delete Product Record
Finally, we delete the product record using this URL: http://localhost:8080/api/2. We choose the DELETE method and press the Send button.
Note: Because I have to delete the records for the 2 Id numbers, your table Id is at the end of URL 2.

The record was also deleted from the h2 database table.


No comments:
Post a Comment